Wednesday, 13 August 2025
Present with Go Modules
There are a few quite interesting utilities in the Go Tools collection, golang.org/x/tools.
One of these is the slide presentation software present.
$ go install golang.org/x/tools/cmd/present@latest
If you have watched any Go presentations in the past, there is quite a chance you have already seen present in action.
For example, many of Rob Pike’s talks are using present, e.g., his talk on lexical scanning.
present renders Markdown-ish files to either slides or articles - such as for the Go blog - to be displayed in a web browser.
Although the feature set is limited, one killer feature is the ability to execute code directly from the slides.
The golang.org/x/tools/present package describes the anatomy of a .slide input file and all available commands.
.play Some Code
The mentioned code execution killer feature is named .play and allows not only embedding code, but actually executing this code.
For example, the following line in a .slide file would display the content of some demo.go file, make the text box editable, and allow the code to be executed.
.play -edit demo.go
Earlier this year, I have used this for my “Privilege Separation In Go” talk at FOSDEM. At around the 02:00 mark in the linked talk, you can see me altered the code to demonstrate the privileges with which the code usually runs.
Later in the talk, I showed multiple Go libraries that I used directly within present.
This, however, was quite a hassle since present - being an older, not so official Go tool - still relies on the $GOPATH.
Since time was not on my side, I have ended up filling the $GOPATH manually.
And all this over six years after Go 1.11, deep in the age of Go Modules.
Since I was planning to work with external libraries in present again, I settled to patch it in this regard.
Just to find out that it can already do this.
.play Me A Go Module
The .play command works not only on Go code, but also on the txtar archive format, which I just learned about today (actually, it was yesterday - I am now finishing this post).
In a nutshell, it is a plain text format concatenating multiple text files, each being introduced by a -- FILENAME -- marker, with FILENAME being the actual file name.
There may also be a comment before the first file’s marker.
The .played file will be parsed as a txtar archive.
If the file is an ordinary Go source code file, there will be no marker and everything is part of the leading comment.
A non-empty comment will then be treated as a prog.go file.
However, if the input contains txtar entries, each one will be created.
Additionally, if a go.mod file is included in the txtar input, the Go code will be built as a Go Module.
In practice, this looks like the following. For example’s sake, I am using the SHA-3 TupleHash library I wrote a while back.
$ go mod init demo
go: creating new go.mod: module demo

$ cat main.go
package main

import (
        "fmt"

        "codeberg.org/oxzi/go-tuplehash"
)

func main() {
        fields := [][]byte{[]byte("foo"), []byte(""), []byte("bar")}
        h := tuplehash.NewTupleHash128(nil, 32)
        for _, field := range fields {
                _, _ = h.Write(field)
        }
        fmt.Printf("%x\n", h.Sum(nil))
}

$ go get codeberg.org/oxzi/go-tuplehash
[ . . . ]
$ go build

$ cp main.go demo.txtar
$ for f in go.{mod,sum}; do echo "-- $f --"; cat "$f"; done >> demo.txtar
This can be demonstrated with a simple .slide file as follows.
The /^func main/,/^}/ part behind the .play calls reduces the printed output to the main function for aesthetic reasons.
# External Module Test

## Go File - Fails

.play main.go /^func main/,/^}/

## Go File from txtar - Works

.play demo.txtar /^func main/,/^}/
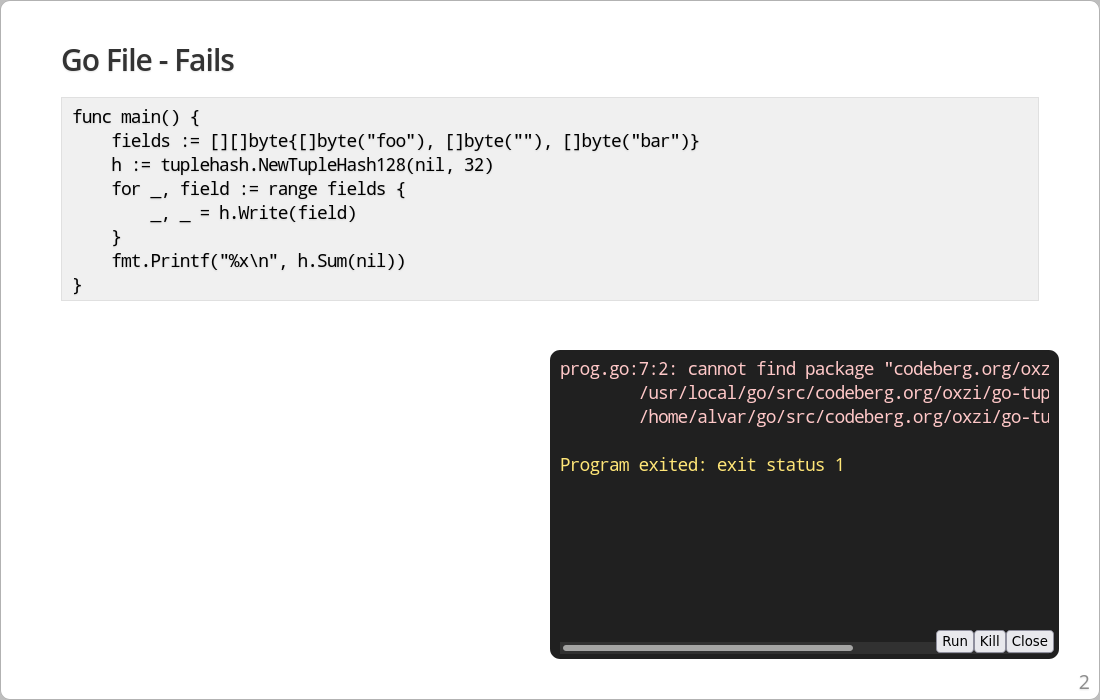
First, present fails due to missing packages - as expected.
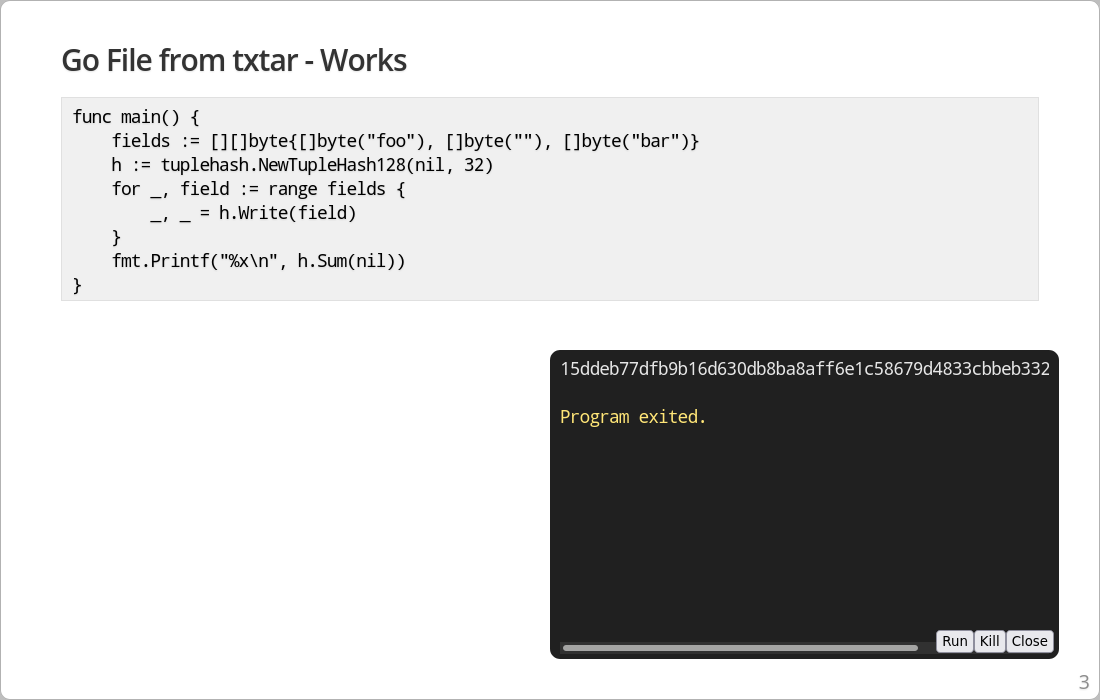
The second example based on txtar works and produces a hopefully valid output.
.play Me Any Script
While poking through the playground socket code, I made another unexpected discovery: shebang support!
If the code starts with a shebang (#!), then it will not be compiled as a Go application, but executed by the shebang interpreter.
Therefore, present can be used to run almost any code.
Let’s demonstrate this with an even simpler example of the following .slide:
# Shebang Test

## Python

.play -edit demo.py
And demo.py looking like this:
#!/usr/bin/env python3

import this
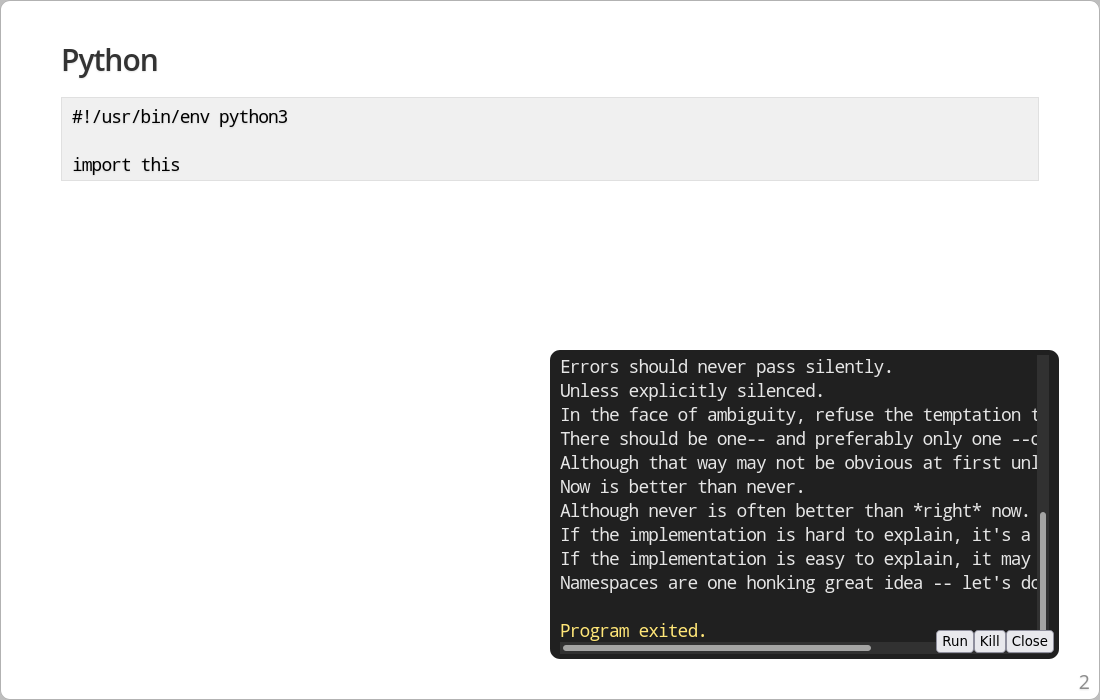
present executing a Python script running the PEP 20 easter egg.
Swimming Upstream Is Hard
First and foremost, a random blog post should not be the place to document implementation behavior. Documentation should be, well, in the docs. I have created a pull request, so let’s see how it turns out.
Google’s contribution maze for Go typically guides one through their Gerrit code review tool.
Last time I have used it was roughly two years ago and, of course, it requires a Google account.
And this was also the last time I have used my Google account, which still has a @googlemail.com address instead of @gmail.com.
What’s my age again?
When I tried to log in to this account, Google blocked the login because it thought there was something suspicious about me. As so called “options” to unblock the account, I should either use the same device or a similar location as last time - I have moved roughly 300km. That’s all, no other options.
No Gerrit for me today. This is just another downsides of big tech FOSS projects.
It’s Not A Bug, It’s A Feature
When people ask me what I like about Go, I usually mention its well documented API.
As being part of the /x/ namespace, the Go Tools are not so official, but once I became accustomed to the high quality documentation, their lack stood out.
And in this case, it misses two very special cases of executing code.
Taking a look at the txtar extraction logic is also a bit scary.
Yes sir, I would like you to extract ../../../../../etc/passwd.
This has only no further security implications as arbitrary user-supplied code will be executed next.
Thus, do not let present run wild and only execute trusted .slides.
Speaking of undocumented behavior, I tried the same thing in the Go Playground and was quite surprised that the txtar trick worked there as well.
Unlike the other code, the Go Playground has some input sanitation in place.
Unfortunately, there seems to be no shebang support.
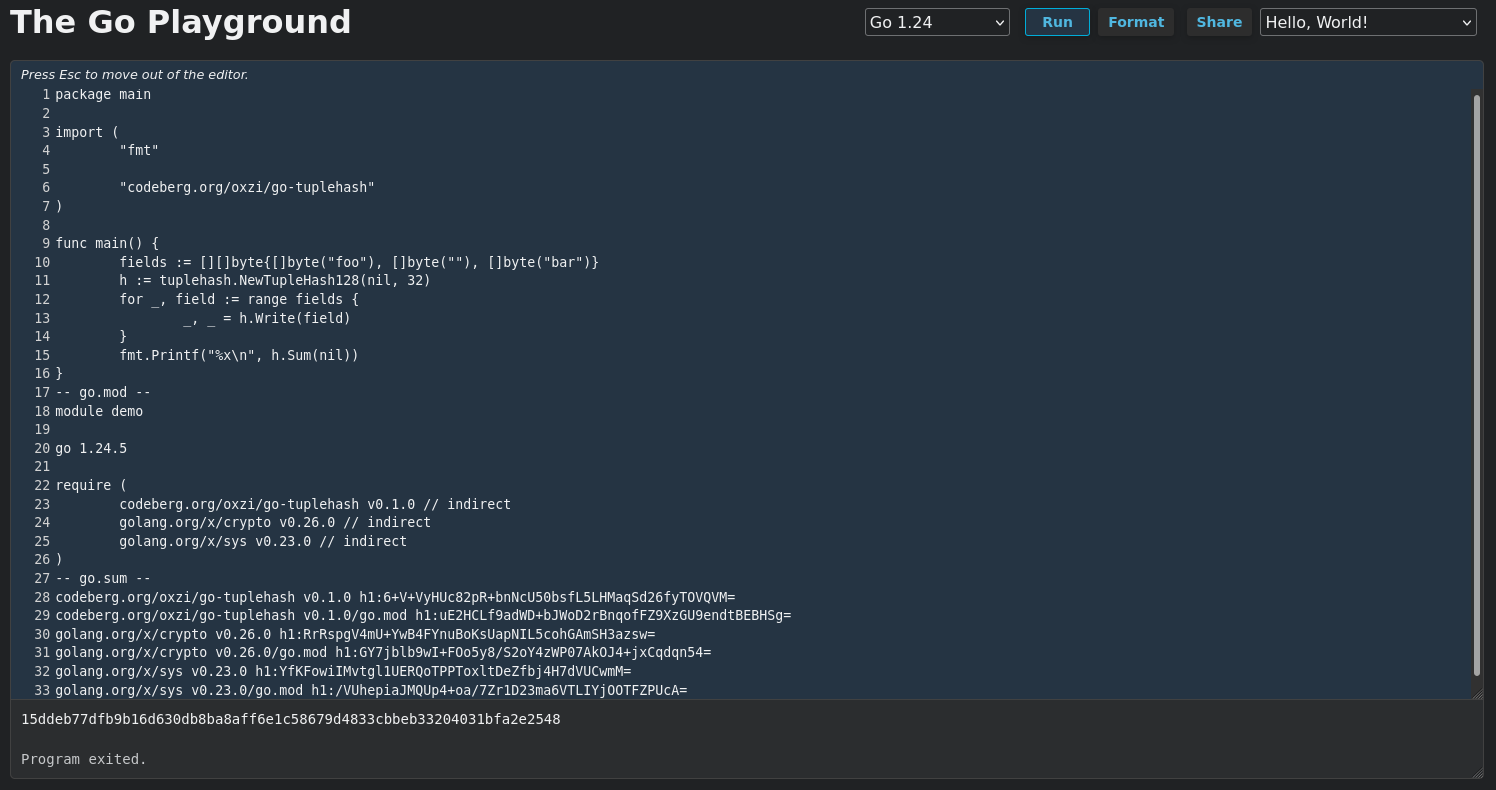
Go Module in the Go Playground as txtar encoded input.
All The Negativity?
The last two sections turned out quite bitter, and I failed to find a way to change that.
However, I wanted to end on a positive note and emphasize one more time that I really enjoy working with present.
It is a fantastic tool, especially for presentations with code.
Use it!
Saturday, 09 August 2025
Rigging-suspended installation of a marine wind generator

We cruise on a small boat, a 31ft double-ender. As we’re off-grid the vast majority of the time, all electricity needs to be produced from renewable sources. Solar produces a lion’s share, but other sources are needed for overcast days. We don’t have space for a permanently mounted wind generator, so we converted a Superwind 350 to rigging-suspended.
Why wind?
As our 2024 cruise to the not-so-sunny Scotland demonstrated, there would still be place for wind power in the renewables mix of a long-distance sailboat. My energy production simulations from 2023 also showed a lot of promise for wind power.
Our boat has a canoe stern and dual aft stays, meaning that there is not much space in the back of the boat. We had a conversation with Superwind back in 2022, and they were of the opinion that there simply isn’t a good space for installing one. And so we installed a hydrogenerator and decided that we’d go sailing if we ran out of power.
But the interest in wind generators remained.

And then one day, rowing around the Sainte-Anne anchorage in rainy Martinique, I saw a potential solution: one of the small cruising boats had a wind generator suspended from ropes in their foretriangle. I chatted a bit with the owners, and they confirmed that the system worked nicely. Time for some research!
Rigging-suspended wind generator
Rigging-suspended wind generators used to be common. Commercial models included the Ampair 100, WindBugger, and the Hamilton-Ferris. As solar power has become cheaper, wind generators in general have fallen out of favor. At the same time cruising boats have grown in size, enabling permanent mounting of a big wind turbine.
These effects combined mean that there are currently no commercial manufacturers of rigging-suspended wind generators for boats.
Of the models once manufactured, the Ampair 100 sounded especially promising. It was a modular system that could be used either as a rigging-suspended wind turbine, or as a “tow generator” for making power while under sail.
This modularity is a big advantage of a rigging-suspended wind generator, especially for ease of stowing. They can also be a lot quieter than the pole-mounted ones, as any vibrations are dampened by the suspension ropes. And of course they don’t cause any windage or shading while stowed.
I tried finding an Ampair for sale online with no luck. The second-hand chandlery in Grenada – Treasure Trove – had two units, but couldn’t locate the wind blades.
However, the wind generator market has evolved quite a bit. There are several good wind generators intended for permanent mounting. Superwind and the D400 provide the best alternatives, but are very expensive. On the cheap end, there are numerous Chinese wind generators from companies like Pikasola and Vevor starting at around $250.
Maybe I could design a bracket to convert one of these for rigging-suspended installation?
Building the bracket
Sitting in the windy anchorage at Spanish Water this idea started sounding more and more interesting. After some paper brainstorming, I grabbed FreeCAD and made an initial design.
The design parameters were:
- Can be built somewhat cheaply by a local metal fabricator
- Can facilitate the most common fixed-mount wind generators
- Poles to keep the rigging lines clear of the propellers
- Wind generator is held in place and the whole assembly turns into the wind
My original idea was a neat stainless ring around the wind generator body. However, different wind generators are of different height, and so in interests of both manufacturing cost and adaptability, I went with two brackets connected by threaded rod.

It took a couple of months to actually get a quote from a local fabricator, but now we finally have the finished brackets for ourselves and a neighboring boat.
You can find the FreeCAD file on GitHub. There are also STEP files for the top bracket and the bottom bracket.
Installation
Our neighbor installed a 400W Pikasola wind generator on theirs. That mounted on the bracket without any other adapting except for some rubber mat to isolate the stainless parts from the aluminium wind turbine body.
We had bought an old Superwind 350 from another boat, and so for us a small connecting piece (140mm long aluminium pipe with 55mm inner diameter) was needed to make that fit.

The wind generator is hoisted using our spinnaker pole topping lift, with a short strop riding on the inner forestay. Stabilization is with a three rope bridle connected to pad eyes on the deck.

We have wires running from the bottom bracket to the deck level, where they connect via MC4 connectors to to cables running to inside the boat. This way we can easily disconnect the wind turbine as needed. We are adding a stop/run switch soon as well to aid deployment.
Deployment is already documented in our boat handbook.
Conclusion
We only got the Superwind deployed yesterday evening, and so we are gathering the early experiences. However, right now we’re on track to producing about 0.6kWh on the first day. This is measured with a dedicated Victron SmartShunt wired to the wind generator regulator and logging into our time series database.

That 0.6kWh per day is like a whole second solar arch!
Noise levels are not too bad at all. Inside the boat you can’t hear anything. In cockpit, you can hear a slight whirr from the generator, but it is a lot quieter than one of the popular pole-mounted wind turbines on neighboring boat, heard from few hundred meters away.
Durability and handling of heavier winds will remain to be seen. As will the practicality of stowing and deploying when changing anchorages. Though we already do similar things with the mast-hoisted solar panels and the nesting dinghy.
Especially when going with one of the cheap Chinese models, this rigging-suspended method can be the way to add wind power to a boat in an affordable way. We calculated the total price for the Pikasola installation to be around the same as what marine wind generator manufacturers ask for just a mounting pole!
The hardware design should be quite easy to manufacture anywhere where you can find a stainless steel welder. After all, we were able to get ours fabricated on a tropical island.
For us the new wind generator can be seen as completing the circle of our deployable renewable options:
- When under sail, power is generated with the hydrogenerator
- When anchored in light winds, power is generated with the mast-hoisted FLINsail solar array
- When anchored in heavier winds, power is generated by the rigging-suspended Superwind
On top of these we have the fixed solar panels.

Tuesday, 05 August 2025
Common Threads of Computer Company History
When descending into the vaults of computing history, as I have found myself doing in recent years, and with the volume of historical material now available for online perusal, it has largely become possible to finally have the chance of re-evaluating some of the mythology cultivated by certain technological communities, some of it dating from around the time when such history was still being played out. History, it is said, is written by the winners, and this is true to a large extent. How often have we seen Apple being given the credit for many technological developments that were actually pioneered elsewhere?
But the losers, if they may be considered that, also have their own narratives about the failure of their own favourites. In “A Tall Tale of Denied Glory”, I explored some myths about Commodore’s Amiga Unix workstation and how it was claimed that this supposedly revolutionary product was destined for success, cheered on by the big names in workstation computing, only to be defeated by Commodore’s own management. The story turned out to be far more complicated than that, but it illustrates that in an earlier age where there was more limited awareness of an industry with broader horizons than many could contemplate, everyone could get round a simplistic tale and vent their frustration at the outcome.
Although different technological communities, typically aligned with certain manufacturers, did interact with each other in earlier eras, even if the interactions mostly focused on advocacy and argument about who had chosen the best system, there was always the chance of learning something from each other. However, few people probably had the opportunity to immerse themselves in the culture and folklore of many such communities at once. Today, we have the luxury of going back and learning about what we might have missed, reading people’s views, and even watching television programmes and videos made about the systems and platforms we just didn’t care for at the time.
It was actually while searching for something else, as most great discoveries seem to happen, that I encountered some more mentions of the Amiga Unix rumours, these being relatively unremarkable in their familiarity, although some of them were qualified by a claim by the person airing these rumours (for the nth time) that they had, in fact, worked for Sun. Of course, they could have been the mailboy for all I know, and my threshold for authority in potential source material for this matter is now set so high that it would probably have to be Scott McNealy for me to go along with these fanciful claims. However, a respondent claimed that a notorious video documenting the final days of Commodore covered the matter.
I will not link to this video for a number of reasons, the most trivial of which is that it just drags on for far too long. And, of course, one thing it does not substantially cover is the matter under discussion. A single screen of text just parrots the claims seen elsewhere about Sun planning to “OEM” the Amiga 3000UX without providing any additional context or verification. Maybe the most interesting thing for me was to see that Commodore were using Apollo workstations running the Mentor Graphics CAD suite, but then so were many other companies at one point in time or other.
In the video, we are confronted with the demise of a company, the accompanying desolation, cameraderie under adversity, and plenty of negative, angry, aggressive emotion coupled with regressive attitudes that cannot simply be explained away or excused, try as some commentators might. I found myself exploring yet another rabbit hole with a few amusing anecdotes and a glimpse into an era for which many people now have considerable nostalgia, but one that yielded few new insights.
Now, many of us may have been in similar workplace situations ourselves: hopeless, perhaps even deluded, management; a failing company shedding its workforce; the closure of the business altogether. Often, those involved may have sustained a belief in the merits of the enterprise and in its products and people, usually out of the necessity to keep going, whether or not the management might have bungled the company’s strategy and led it down a potentially irreversible path towards failure.
Such beliefs in the company may have been forged in earlier, more successful times, as a company grows and its products are favoured over those of the competition. A belief that one is offering something better than the competition can be highly motivating. Uncalibrated against the changing situation, however, it can lead to complacency and the experience of helplessly watching as the competition recover and recapture the market. Trapped in the moment, the sequence of events leading to such eventualities can be hard to unravel, and objectivity is usually left as a matter for future observers.
Thus, the belief often emerges that particular companies faced unique challenges, particularly by the adherents of those companies, simply because everything was so overwhelming and inexplicable when it all happened, like a perfect storm making an unexpected landfall. But, being aware of what various companies experienced, and in peeking over the fence or around the curtain at what yet another company may have experienced, it turns out that the stories of many of these companies all have some familiar, common themes. This should hardly surprise us: all of these companies will have operated largely within the same markets and faced common challenges in doing so.
A Tale of Two Companies
The successful microcomputer vendors of the 1980s, which were mostly those that actually survived the decade, all had to transition from one product generation to the next. Acorn, Apple and Commodore all managed to do so, moving up from 8-bit systems to more sophisticated systems using 32-bit architectures. But these transitions only got them so far, both in terms of hardware capabilities and the general sophistication of their systems, and by the early 1990s, another update to their technological platforms was due.
Acorn had created the ARM processor architecture, and this had mostly kept the company competitive in terms of hardware performance in its traditional markets. But it had chosen a compromised software platform, RISC OS, on which to base its Archimedes systems. It had also introduced a couple of Unix workstation products, themselves based on the Archimedes hardware, but these were trailing the pace in a much more competitive market. Acorn needed the newly independent ARM company to make faster, more capable chips, or it would need embrace other processor architectures. Without such a boost forthcoming, it dropped Unix and sought to expand in “longshot” markets like set-top boxes for video-on-demand and network computing.
Commodore had a somewhat easier time of it, at least as far as processors were concerned, riding on the back of what Motorola had to offer, which had been good enough during much of the 1980s. Like Acorn, Commodore made their own graphics chips and had enjoyed a degree of technical superiority over mainstream products as a result, but as Acorn had experienced, the industry had started to catch up, leading to a scramble to either deliver something better or to go with the mainstream. Unlike Acorn, Commodore did do a certain amount of business actually going with the mainstream and selling IBM-compatible PCs, although the increasing commoditisation of that business led the company to disengage and to focus on its own technologies.
Commodore had its own distractions, too. While Acorn pursued set-top boxes for high-bandwidth video-on-demand and interactive applications on metropolitan area networks, Commodore tried to leverage its own portfolio rather more directly, trading on its strengths in gaming and multimedia, hoping to be the one who might unite these things coherently and lucratively. In the late 1980s and early 1990s, Japanese games console manufacturers had embraced the Compact Disc format, but NEC’s PC Engine CD-ROM² and Sega’s Mega-CD largely bolted CD technology onto existing consoles. Philips and Sony, particularly the former, had avoided direct competition with games consoles, pitching their CD-i technology more at the rather more sedate “edutainment” market.
With CDTV, Commodore attempted to enter the same market at Philips, downplaying the device’s Amiga 500 foundations and fast-tracking the product to market, only belatedly offering the missing CD-ROM drive option for its best-selling Amiga 500 system that would allow existing customers to largely recreate the same configuration themselves. Both CD-i and CDTV were considered failures, but Commodore wouldn’t let go, eventually following up with one of the company’s final products, the CD32, aiming more directly at the console market. Although a relative success against the lacklustre competition, it came too late to save the company which had entered a steep decline only to be driven to bankruptcy by a patent aggressor.
Whether plucky little Commodore would have made a comeback without financial headwinds and patent industry predators is another matter. Early multimedia consoles had unconvincing video playback capabilities without full-motion video hardware add-ons, but systems like the 3DO Interactive Multiplayer sought to strengthen the core graphical and gaming capabilities of such products, introducing hardware-accelerated 3D graphics and high-quality audio. Within only a year or so of the CD32’s launch, more complete systems such as the Sega Saturn and, crucially, the Sony PlayStation would be available. Commodore’s game may well have been over, anyway.
Back in Cambridge, a few months after Commodore’s demise, Acorn entered into a collaboration with an array of other local technology, infrastructure and media companies to deliver network services offering “interactive television“, video-on-demand, and many of the amenities (shopping, education, collaboration) we take for granted on the Internet today, including access to the Web of that era. Although Acorn’s core technologies were amenable to such applications, they did need strengthening in some respects: like multimedia consoles, video decoding hardware was a prerequisite for Acorn’s set-top boxes, and although Acorn had developed its own competent software-based video decoding technology, the market was coalescing around the MPEG standard. Fortunately for Acorn, MPEG decoder hardware was gradually becoming a commodity.
Despite this interactive services trial being somewhat informative about the application of the technologies involved, the video-on-demand boom fizzled out, perhaps demonstrating to Acorn once again that deploying fancy technologies in a relatively affluent region of the country for motivated, well-served early adopters generally does not translate into broader market adoption. Particularly if that adoption depended on entrenched utility providers having to break open their corporate wallets and spend millions, if not billions, on infrastructure investments that would not repay themselves for years or even decades. The experience forced Acorn to refocus its efforts on the emerging network computer trend, leading the company down another path leading mostly nowhere.
Such distractions arguably served both companies poorly, causing them to neglect their core product lines and to either ignore or to downplay the increasing uncompetitiveness of those products. Commodore’s efforts to go upmarket and enter the potentially lucrative Unix market had begun too late and proceeded too slowly, starting with efforts around Motorola 68020-based systems that could have opened a small window of opportunity at the low end of the market if done rather earlier. Unix on the 68000 family was a tried and tested affair, delivered by numerous companies, and supplied by established Unix porting houses. All Commodore needed to do was to bring its legendary differentiation to the table.
Indeed, Acorn’s one-time stablemate, Torch Computers, pioneered low-end graphical Unix computing around the earlier 68010 processor with its Triple X workstation, seeking to upgrade to the 68020 with its Quad X workstation, but it had been hampered by a general lack of financing and an owner increasingly unwilling to continue such financing. Coincidentally, at more or less the same time that the assets of Torch were finally being dispersed, their 68030-based workstation having been under development, Commodore demonstrated the 68030-based Amiga 3000 for its impending release. By the time its Unix variant arrived, Commodore was needing to bring far more to the table than what it could reasonably offer.
Acorn themselves also struggled in their own moves upmarket. While the ARM had arrived with a reputation of superior performance against machines costing far more, the march of progress had eroded that lead. The designers of the ARM had made a virtue of a processor being able to make efficient use of its memory bandwidth, as opposed to letting the memory sit around idle as the processor digested each instruction. This facilitated cheaper systems where, in line with the design of Acorn’s 8-bit computers, the processor would take on numerous roles within the system including that of performing data transfers on behalf of hardware peripherals, doing so quite effectively and obviating the need for costly interfacing circuitry that would let hardware peripherals directly access the memory themselves.
But for more powerful systems, the architectural constraints can be rather different. A processor that is supposedly inefficient in its dealings with memory may at least benefit from peripherals directly accessing memory independently, raising the general utilisation of the memory in the system. And even a processor that is highly effective at keeping itself busy and highly efficient at utilising the memory might be better off untroubled by interrupts from hardware devices needing it to do work for them. There is also the matter of how closely coupled the processor and memory should be. When 8-bit processors ran at around the same speed as their memory devices, it made sense to maximise the use of that memory, but as processors increased in speed and memory struggled to keep pace, it made sense to decouple the two.
Other RISC processors such as those from MIPS arrived on the market making deliberate use of faster memory caches to satisfy those processors’ efficient memory utilisation while acknowledging the increasing disparity between processor and memory speeds. When upgrading the ARM, Acorn had to introduce a cache in its ARM3 to try and keep pace, doing so with acclaim amongst its customers as they saw a huge jump in performance. But such a jump was long overdue, coming after Acorn’s first Unix workstation had shipped and been largely overlooked by the wider industry.
Acorn’s second generation of workstations, being two configurations of the same basic model, utilised the ARM3 but lacked a hardware floating-point unit. Commodore could rely on the good old 68881 from Motorola, but Acorn’s FPA10 (floating-point accelerator) arrived so late that only days after its announcement, three years or so after those ARM3-based systems had been launched and two years later than expected, Acorn discontinued its Unix workstation effort altogether.
It is claimed that Commodore might have skipped the 68030 and gone straight for the 68040 in its Unix workstation, but indications are that the 68040 was probably scarce and expensive at first, and soon only Apple would be left as a major volume customer for the product. All of the other big Motorola 68000 family customers had migrated to other architectures or were still planning to, and this was what Commodore themselves resolved to do, formulating an ambitious new chipset called Hombre based around Hewlett-Packard’s PA-RISC architecture that was never realised.

A chart showing how Unix workstation performance steadily improved, largely through the introduction of steadily faster RISC processors. Note how the HP 9000/425t gets quite impressive performance from the 68040. Even a system introduced with a 68060 straight off the first production run in 1994 would have been up against fearsome competition. Worth mentioning is that Acorn’s R140, although underpowered, was a low-cost colour workstation running Unix and the X Window System.
Acorn, meanwhile, finally got a chip upgrade from ARM in the form of the rather modest ARM6 series, choosing to develop new systems around the ARM600 and ARM610 variants, along with systems using upgraded sound and video hardware. One additional benefit of the newer ARM chips was an integrated memory management unit more suitable for Unix implementations than the one originally developed for the ARM. For followers of the company, such incoming enhancements provided a measure of hope that the company’s products would remain broadly competitive in hardware terms with mainstream personal computers.
Perhaps most important to most Acorn users at the time, given the modest gains they might see from the ARM600/610, was the prospect of better graphical capabilities, but Acorn chose not to release their intermediate designs along the way to their grand new system. And so, along came the Risc PC: a machine with two processor sockets and logic to allow one of the processors to be an x86-compatible processor that could run PC software. Once again, Acorn gave the whole hardware-based PC accelerator card concept another largely futile outing, failing to learn that while existing users may enjoy dabbling with software from another platform, it hardly ever attracts new customers in any serious numbers. Even Commodore had probably learned that lesson by then.
Nevertheless, Acorn’s Risc PC was a somewhat credible platform for Unix, if only Acorn hadn’t cancelled their own efforts in that realm. Prominent commentators and enthusiastic developers seized the moment, and with Free Software Unix implementations such as NetBSD and FreeBSD emerging from the shadow of litigation cast upon them, a community effort could be credibly pursued. Linux was also ported to ARM, but such work was actually begun on Acorn’s older A5000 model.
Acorn never seized this opportunity properly, however. Despite entering the network computer market in pursuit of some of Larry Ellison’s billions, expectations of the software in network computers had also increased. After all, networked computers have many of the responsibilities of those sophisticated minicomputers and workstations. But Acorn was still wedded to RISC OS and, for the most part, to ARM. And it ultimately proved that while RISC OS might present quite a nice graphical interface, it was actually NetBSD that could provide the necessary versatility and reliability being sought for such endeavours.
And as the 1990s got underway, the mundane personal computer started needing some of those workstation capabilities, too, eventually erasing the distinction between these two product categories. Tooling up for Unix might have seemed like a luxury, but it had been an exercise in technological necessity. Acorn’s RISC OS had its attractions, notably various user interface paradigms that really should have become more commonplace, together with a scalable vector font system that rendered anti-aliased characters on screen years before Apple or Microsoft managed to, one that permitted the accurate reproduction of those fonts on a dot-matrix printer, a laser printer, and everything in-between.
But the foundations of RISC OS were a legacy from Acorn’s 8-bit era, laid down hastily in an arguably cynical fashion to get the Archimedes out of the door and to postpone the consequences. Commodore inevitably had similar problems with its own legacy software technology, ostensibly more modern than Acorn’s when it was introduced in the Amiga, even having some heritage from another Cambridge endeavour. Acorn might have ported its differentiating technologies to Unix, following the path taken by Torch and its close relative, IXI, also using the opportunity to diversify its hardware options.
In all of this consideration given to Acorn and Commodore, it might seem that Apple, mentioned many paragraphs earlier, has been forgotten. In fact, Apple went through many of the same trials and ordeals as its smaller rivals. Indeed, having made so much money from the Macintosh, Apple’s own attempts to modernise itself and its products involve such a catalogue of projects and initiatives that even summarising them would expand this article considerably.
Only Apple would buy a supercomputer to attempt to devise its own processor architecture – Aquarius – only not to follow through and eventually be rescued by the pair of IBM and Motorola, humbled by an unanticipated decline in their financial and market circumstances. Or have several operating system projects – Opus, Pink, Star Trek, NuKernel, Copland – that were all started but never really finished. Or to get into personal digital assistants with the unfairly maligned Newton, or to consider redesigning the office entirely with its Workspace 2000 collaboration. And yet end up acquiring NeXT, revamping its technologies along that company’s lines, and still barely make it to the end of the decade.
The Final Chapters
Commodore got almost half-way through the 1990s before bankruptcy beckoned. Motorola’s 68060, informed by the work on the chip manufacturer’s abandoned 88000 RISC architecture, provided a considerable performance boost to its more established architecture, even if it now trailed the pack, perhaps only matching previous generations of SPARC and MIPS processors, and now played second fiddle to PowerPC in Motorola’s own line-up.
Acorn’s customers would be slightly luckier. Digital’s StrongARM almost entirely eclipsed ARM’s rather sedate ARM7-based offerings, except in floating-point performance in comparison to a single system-on-chip product, the ARM7500FE. This infusion of new technology was a blessing and a curse for Acorn and its devotees. The Risc PC could not make full use of this performance, and a new machine would be needed to truly make the most of it, also getting a long-overdue update in a range of core industry technologies.
Commodore’s devotees tend to make much of the company’s mismanagement. Deserved or otherwise, one may now be allowed to judge whether the company was truly unique in this regard. As Acorn’s network computer ambitions were curtailed, market conditions became more unfavourable to its increasingly marginalised platform, and the lack of investment in that core platform started to weigh heavily on the company and its customers. A shift in management resulted in a shift in business and yet another endeavour being initiated.
Acorn’s traditional business units were run down, the company’s next generation of personal computer hardware cancelled, and yet a somewhat tangential silicon design business was effectively being incubated elsewhere within the organisation. Meanwhile, Acorn, sitting on a substantial number of shares in ARM, supposedly presented a vulnerability for the latter and its corporate stability. So, a plan was hatched that saw Acorn sold off to a division of an investment bank based in a tax haven, the liberation of its shares in ARM, and the dispersal of Acorn’s assets at rather low prices. That, of course, included the newly incubated silicon design operation, bought by various figures in Acorn’s “senior management”.
Just as Commodore’s demise left customers and distributors seemingly abandoned, so did Acorn’s. While Commodore went through the indignity of rescues and relaunches, Acorn itself disappeared into the realms of anonymous holding companies, surfacing only occasionally in reports of product servicing agreements and other unglamorous matters. Acorn’s product lines were kept going for as long as could be feasible by distributors who had paid for the privilege, but without the decades of institutional experience of an organisation terminated almost overnight, there was never likely to be a glorious resurgence of its computer systems. Its software platform was developed further, primarily for set-top box applications, and survives today more as a curiosity than a contender.
In recent days, efforts have been made by Commodore devotees to secure the rights to trademarks associated with the company, these having apparently been licensed by various holding companies over the years. Various Acorn trademarks were also offloaded to licensors, leading to at least one opportunistic but ill-conceived and largely unwelcome attempt to trade on nostalgia and to cosplay the brand. Whether such attempts might occur in future remains uncertain: Acorn’s legacy intersects with that of the BBC, ARM and other institutions, and there is perhaps more sensitivity about how its trademarks might be used.
In all of this, I don’t want to downplay all of the reasons often given for these companies’ demise, Commodore’s in particular. In reading accounts of people who worked for the company, it is clear that it was not a well-run workplace, with exploitative and abusive behaviour featuring disturbingly regularly. Instead, I wish to highlight the lack of understanding in the communities around these companies and the attribution of success or failure to explanations that do not really hold up.
For instance, the Acorn Electron may have consumed many resources in its development and delivery, but it did not lead to Acorn’s “downfall”, as was claimed by one absurd comment I read recently. Acorn’s rescue by Olivetti was the consequence of several other things, too, including an ill-advised excursion into the US market, an attempt to move upmarket with an inadequate product range, some curious procurement and logistics practices, and a lack of capital from previous stock market flotations. And if there had been such a “downfall”, such people would not be piping up constantly about ARM being “the chip in everyone’s phone”, which is tiresomely fashionable these days. ARM may well have been just a short footnote in some dry text about processor architectures.
In these companies, some management decisions may have made sense, while others were clearly ill-considered. Similarly, those building the products could only do so much given the technological choices that had already been made. But more intriguing than the actual intrigues of business is to consider what these companies might have learned from each other, what the product developers might have borrowed from each other had they been able to, and what they might have achieved had they been able to collaborate somehow. Instead, both companies went into decline and ultimately fell, divided by the barriers of competition.
Thursday, 31 July 2025
Stop Killing Games

Updated on the 31st of July to reflect the fact deadline for both petitions have now passed.
The dystopian interpretation of the ‘you’ll own nothing and be happy’ phrase feels increasingly prescient.1 As corporations hide behind lengthy Terms of Service and End User License Agreements,2 the concept of ownership becomes alarmingly ambiguous. This erosion of consumer rights has given rise to the Stop Killing Games (SKG) movement.
In 2015 I’ve stumbled upon the Classic Tetris World Championship. Even though I’d never played NES Tetris, I started following the event with interest. I keenly remember watching the historic 2018 final which was a prelude to the next generation of players picking up the game.
In contrast, world of racing games offer an example of fleeting ownership. While generations continue to enjoy NES Tetris, with a 13-year-old famously ‘beating’ the game 34 years after its release,3 Ubisoft’s 2014 game The Crew didn’t even last a decade. In 2024, Ubisoft didn’t just shut down the servers; it began revoking players’ licenses, seemingly doing everything in its power to ensure the game couldn’t be preserved or revived by the community.
Customer rights
Even if you don’t care about video games, SKG is an important cause worth the few minutes needed to sign. The way I see it, this isn’t just about games, since the practices in the gaming industry are setting a dangerous precedent for other products.
Imagine if a developer could enter your house and take away a disk with professional software that your livelihood depends on. Or if a publisher could rip away a copy of your favourite novel from your shelf (cf. Amazon’s licensing debacle). Or if a hardware manufacturer could remotely brick your device without giving a reason. It’s quite easy to imagine, considering that things like that already happen. Just recently, Nintendo got into hot water for its ability to brick users’ Switch 2 consoles.
If this model of revoking access to purchased products finds no opposition in the world of video games, it’ll inevitably spread to other forms of digital content and even physical products with digital components. The SKG initiative is not just about games; it’s a stand against a future where our ownership is conditional. If we don’t act now, we may wake up in a Black Mirror episode.
The initiative
The goal of SKG is a world where once a customer buys a game, they own its copy and can continue playing it even if the publisher loses interest in it. The movement initiated two petitions:
- the European Citizen’s Initiative which has since ended with 1.4 million signatures; and
- the UK Government and Parliament petition which has since ended with nearly 190 thousand signatures.
Those are not symbolic Internet petitions; they are a part of a legislative process. Their goal has been reached since writing of this article, which forces a) a formal responses from the European Commission and b) a debated about the issue in the UK Parliament.
They experienced a dramatic rise in the number of petitioners recently. On the 2nd of July, the UK petition reached its goal of one hundred thousand signatures; a day later, the EU initiative reached its goal of one million signatures. However, there are still reasons to sign.
Ensuring validity
A buffer of signatures is needed to account for any that may be deemed invalid during official verification process.
Sending a message
Politicians and especially game publishers are watching. The greater the number of signatures, the clearer it is people are serious about the issue. Contrary to popular belief, vocal customers can affect change. Even if neither EU nor UK governments enact any new laws, game publishers may still think twice before implementing anti-customer features.
Broader support
For the EU initiative, reaching individual signature thresholds in all 27 member states would signify a pan-European unity on the issue. For that to happen we need more signatures from Malta, Cyprus and Luxembourg in particular.
1 It’s worth noting that the phrase is somewhat misunderstood. There was never an agenda to make it a reality but rather observation that things seem to move towards a world where everything is a service. With a view of how such future might look, it brought discussion of ownership to the forefront. ↩
2 Michael Karanicolas. 2021. Too Long; Didn't Read: Finding Meaning in Platforms’ Terms of Service Agreements. University of Toledo Law Review, Vol. 52, No. 1, 2021. doi:10.2139/ssrn.3887753 ↩
3 Historically, level 29 of NES Tetris was considered the kill screen because people could not keep up with game’s speed at that level. However, as younger generation of players got involved, new playing techniques were developed and beating level 29 became the norm. Eventually, Blue Scuti reaching level 157 and crashing the game therefore ‘beating’ Tetris. See aGameScout’s video for more detailed description. ↩
Sunday, 13 July 2025
Be My Guest at DSN 2025

I’m delighted to share my paper I’ve presented at the IEEE/IFIP International Conference on Dependable Systems: ‘Be My Guest: Welcoming Interoperability into IBC-Incompatible Blockchains’.
It introduces the concept of a guest blockchain which runs on top of a blockchain and provides features necessary to support the Inter-Blockchain Communication (IBC) protocol. This enables trustless cross-chain interoperability between blockchains which would otherwise not support IBC-based communication. We demonstrate our approach by deploying the guest blockchain on Solana connecting it to the Cosmos ecosystem with performance comparable to native IBC implementations.
Neapolitan heat notwithstanding, the conference was captivating with papers on variety of fascinating subjects. Naturally, AI was a popular topic. For example, Stephan Kleber talked about transferability of adversarial patches1 and Marta Kwiatkowska discussed provably correct autonomous systems. I’ve previously written about AI risks and it becomes apparent that relying on neural networks alone is insufficient for safety-critical systems.
Alas, I digress. After tumultuous history, ‘Be My Guest’ paper is now available together with the conference slides:
- IEEE Xplore entry
- The accepted paper (PDF, 286 k)
- Conference slides (PDF, 410 k)
This work is related to my articles about the Solana runtime. They describe limitations I had to content with when implementing the Solana IBC bridge:
1 Stephan Kleber, Jeremias Eppler, Tim Palm, Dennis Eisermann, and Frank Kargl. 2025. Assessing the Transferability of Adversarial Patches in Real-World Systems: Implications for Adversarial Testing of Image Recognition Security. In 55th Annual IEEE/IFIP International Conference on Dependable Systems and Networks – Supplemental Volume (DSN-S), Naples, Italy, 42–47. doi:10.1109/DSN-S65789.2025.00040 ↩
Saturday, 05 July 2025
KDE Gear 25.08 branches created

Make sure you commit anything you want to end up in the KDE Gear 25.08
releases to them
Next Dates:
- July 10 2025: 25.08 Freeze and Beta (25.07.80) tag & release
- July 24 2025: 25.08 RC (25.07.90) Tagging and Release
- August 7 2025: 25.08 Tagging
- August 14 2025: 25.08 Release
Wednesday, 25 June 2025
KDE will drop Qt5 CI Support at the End of September 2025
If you are a developer and your KDE project is still based on Qt5 you should really really start porting to Qt6 now.
https://mail.kde.org/pipermail/kde-devel/2025-June/003742.html
Tuesday, 24 June 2025
On publishing Ada & Zangemann in Danish
I and Øjvind started working in the Danish translation of Ada & Zangemann in 2023, Øjvind as translator and myself as proofreader.
Throughout 2024, we tried pitching the book to a number of Danish publishing houses, to no avail: Some didn’t respond, others didn’t want to publish the book.
In order to get an idea of what it would take to just print it, we got a quote from the Danish printing house LaserTryk, and it seemed OK: About DKK 40,000 for 1,000 copies or DKK 52,000 for 2,000 (note: 1 DKK ~0.13€, i.e. 1€ ~ 7.5 DKK). We briefly entertained the idea of doing print on demand only but quickly dismissed the idea: It’s difficult for a book that’s print on demand only and doesn’t go through the whole publishing cycle the way a “real” printed book does to have the same kind of cultural impact. And of course we’d like this book to have the maximum cultural impact possible.
And yet, the only remaining option seemed to publish it ourselves. So I registered a company with the Danish authorities, and we – I, Nico, Øjvind and Matthias – started work on the production of the printable PDF.
In order to raise money for paying the printing bill and various other expenses, I did the following:
- I gave the newly formed company a loan of DKK 60,000 (~8,000€) from my own savings
- I contacted various organizations about buying copies of the book to support. Notably, PROSA (the IT worker’s union, who have often supported free software initiatives) pledged to buy 100 copies. The companies Magenta and Semaphor also pledged to buy some copies.
We also contacted the children’s coding charity Coding Pirates who bought a box (33 copies) to sell on their web shop.
This advance sales almost covered half the printing bill (we ended up printing 2,000 copies).
The next step was to tell people about the book. We did this, among other things, by having a premiere for the Danish edition of the Ada & Zangemann film on March 27; by posting on Maston etc., and by having an official book launch on June 16.
We also sent review copies to various newspapers, and we submitted two copies to the Danish National Bibliography.
By doing that, we ensured that the book was considered for purchase by the public libraries. This in fact resulted in the book getting a healthy recommendation.
A good friend who is a self-published author himself adviced me to get a deal with a distributor – that would mean the book is available on the portal all booksellers use to order books, and that the distributor can handle all the necessary shipping. Such an agreement is not free of charge (of course), but on the other hand they will send any proceeds from sales to bookstores and libraries on a monthly basis with no extra work for the publisher.
So, how does it look now that the book has been published?
So far, ~250 copies have been sold, either through advance sales (as noted) or to individuals paying directly to me. From this, I received money enough for the company to repay me DKK 30,000 in early May. The company at the time of writing holds about DKK 20,000 but also owes the tax authorities about DKK 6,500 which will be paid later in June.
All in all, subtracting some storage expenses the deal may be some DKK 20,000 in the red – i.e., I still need to make about DKK 20,000 to break even.
The FSFE has pledged to buy some copies, and that, combined with the money I expect to come in soon from sales in book stores and to libraries, should ensure the numbers will become black soon. Once the remaining DKK 20,000 have been repaid to my savings, the company must pay its own way.
So, as I said: When the actual sales to libraries etc. start, the numbers should start becoming black. When that happens, the company can reinvest, e.g. gifting books to schools to raise awareness of the book, etc.
Just for possible inspiration – self-publishing is kind of doable in that way. What’s important, if you wish to use this procedure in your own country, is to use the existing professional infrastructure for book publishing: Distributors, library reviewers etc., and thankfully I had good help with that.
Sunday, 15 June 2025
KDE Gear 25.08 release schedule
This is the release schedule the release team agreed on
https://community.kde.org/Schedules/KDE_Gear_25.08_Schedule
Dependency freeze is in around 2 weeks (July 3) and feature freeze one
after that. Get your stuff ready!
A tale of two pull requests: Addendum
In the previous post, I criticised Rust’s contribution process, where a simple patch languished due to communication hurdles. Rust isn’t unique in struggling with its process. This time, the story is about Python.
Parsing HTML in Python
As its name implies, the html.parser module provides interfaces for parsing HTML documents. It offers an HTMLParser base class users can extend to implement their own handling of HTML markup. Of our interest is the unknown_decl method, which ‘is called when an unrecognised declaration is read by the parser.’ It’s called with an argument containing ‘the entire contents of the declaration inside the <![...]> markup.’ For example:
from html.parser import HTMLParser

class MyParser(HTMLParser):
    def unknown_decl(self, data: str) -> None:
        print(data)

parser = MyParser()
parser.feed('<![if test]>')
    # Prints out: if test
    # (unless Python 3.13.4+, see below)
parser.feed('<![CDATA[test]]>')
    # Prints out: CDATA[test
Notice the problem? When used with a CDATA declaration, the behavior doesn’t quite match the documentation: the argument passed to unknown_decl is missing a closing square bracket. This behaviour makes a simple task unexpectedly difficult. An HTML filter — say one which sanitises user input — would risk corrupting the data by adding the wrong number of closing brackets.
In May 2021, I developed and submitted a fix for the issue. However, contributing to Python requires signing a Python Software Foundation contributor license agreement (CLA), which required an account on bugs.python.org website. The problem is: I never received the activation email.
Eventually, a few days after the submission, a bot tagged the pull request with ‘CLA signed’ label. That should imply that everything was in order, and the patch was ready to be reviewed and merged. Yet, a year later, the label was manually removed, leaving the PR in limbo with no explanation. Was the CLA signed or not? The system itself seemed to have no consistent answer.
Python 3.13.4
Python 3.13.4 came out last week and changed this particular corner of the codebase. CDATA handling is unchanged, but other declarations are now passed to the parse_bogus_comment method, which uses a different matching mechanism.
Ironically, while that solved a different issue users had, the documentation remains incorrect and the CDATA handling is still bizarre (unknown_decl is called with unmatched square brackets) not to call it outright broken.
Discussion
I’m not fond of CLAs in the best of times, but if a project requires them, the least it could do is make sure that the system for getting them signed works correctly. It is surprising getting a physical paperwork for my Emacs contributions1 was easier than getting things done electronically for Python.
There were two differences: barrier to entry and someone to follow up on the signing process. To initiate contribution to Emacs, an email account is sufficient and sending a patch is enough to get the process started. In Python, there is upfront barrier of creating bugs.python.org account and signing the CLA.
Secondly, Emacs process had people involved ready to follow up. Any confusion I had was addressed, and — even though slow as it involved the post — it went smoothly. This was not the case in Python where there was no obvious way to contact someone about problems.
Ultimately, a thriving free software project needs not only quality code but also healthy community of contributors. Both Python and Rust are phenomenal technical achievements, but these stories show how even giants can stumble on human-scale issues.
1 It is my understanding that GNU projects which require copyright assignment offer an electronic process now. ↩
On a tale of two pull requests
I was going to leave a comment on “A tale of two pull requests”, but would need to authenticate myself via one of the West Coast behemoths. So, for the benefit of readers of the FSFE Community Planet, here is my irritable comment in a more prominent form.
I don’t think I appreciate either the silent treatment or the aggression typically associated with various Free Software projects. Both communicate in some way that contributions are not really welcome: that the need for such contributions isn’t genuine, perhaps, or that the contributor somehow isn’t working hard enough or isn’t good enough to have their work integrated. Never mind that the contributor will, in many cases, be doing it in their own time and possibly even to fix something that was supposed to work in the first place.
All these projects complain about taking on the maintenance burden from contributions, yet they constantly churn up their own code and make work for themselves and any contributors still hanging on for the ride. There are projects that I used to care about that I just don’t care about any more. Primarily, for me, this would be Python: a technology I still use in my own conservative way, but where the drama and performance of Python’s own development can just shake itself out to its own disastrous conclusion as far as I am concerned. I am simply beyond caring.
Too bad that all the scurrying around trying to appeal to perceived market needs while ignoring actual needs, along with a stubborn determination to ignore instructive prior art in the various areas they are trying to improve, needlessly or otherwise, all fails to appreciate the frustrating experience for many of Python’s users today. Amongst other things, a parade of increasingly incoherent packaging tools just drives users away, heaping regret on those who chose the technology in the first place. Perhaps someone’s corporate benefactor should have invested in properly addressing these challenges, but that patronage was purely opportunism, as some are sadly now discovering.
Let the core developers of these technologies do end-user support and fix up their own software for a change. If it doesn’t happen, why should I care? It isn’t my role to sustain whatever lifestyle these people feel that they’re entitled to.
Sunday, 08 June 2025
A tale of two pull requests
In November 2015, rmcgibbo opened Twine Issue #153. Less than two months later, he closed it with no explanation. The motive behind this baffling move might have remained an unsolved Internet mystery if not for one crucial fact: someone asked and rmcgibbo was willing to talk:
thedrow on Dec 31, 2015ContributorWere you able to resolve the issue?rmcgibbo on Dec 31, 2015AuthorNo. I decided I don’t care.
We all had such moments, and this humorous exchange serves as a reminder that certain matters are not worth stressing about. Like Marcus Aurelius once said, ‘choose not to be harmed — and you won’t feel harmed.’ However, instead of discussing philosophy, I want to bring up some of my experiences to make a point about contributions to free software projects.
The two pull requests
Rather than London and Paris, this tale takes place on GitHub and linux-kernel mailing list. The two titular pull requests (PRs) are of my own making and contrast between them help discuss and critique Rust’s development process.
Matching OS strings in Rust
At the beginning of 2023, I started looking into adding features to Rust that would allow for basic parsing of OsStr values.1 I eventually stumbled upon RFC 1309 and RFC 2295 which described exactly what I needed. The only problem was that they lacked an implementation. I set out to change that.
I submitted the OsStr pattern matching PR inspired by those RFCs in March 2023. Throughout April and May, I made various minor fixes to address Windows test failures, all while waiting for a reaction from the Rust project. I had no idea whether my approach was acceptable and I didn’t want to spend more time on a PR only for it to be rejected.
And waited I did. Nearly two years, until January 2025, when the Rust project finally responded. The code was accepted. A pity that I didn’t care any longer. I certainly didn’t care enough to resolve the numerous merge conflicts that had accumulated in the interim.
The PR was closed soon after and the feature remains unimplemented.
Allocating memory in Linux
In July 2010, I submitted the Contiguous Memory Allocator (CMA) to the linux-kernel. At the time, it was a relatively small patchset with only four commits. I didn’t know then that it was the beginning of quite an adventure. The code went through several revisions and required countless hours of additional work and discussions.
It was April 2012, nearly two years later, when version 24 of the patchset was eventually merged. By then, it had grown to 16 commits and included two other contributors.
On paper, both contributions took nearly two years from submission to conclusion. And yet, while I remain particularly fond of my CMA work, the Rust experience is an example of why I dislike contributing to Rust. The two years in the Linux world were filled with hours of discussion, revisions and rewarding collaboration, the two years in the Rust world were defined by silence.
Discussion
The linux-kernel is often described as a hostile environment. Linus Torvalds in particular has been criticised numerous times for his colourful outbursts. I don’t recall interacting with Linus directly, but I too have received dressing-downs; I remember the late David Brownell rightfully scolding me for my handling of USB product identifiers for example.
And yet, I would take that direct, if sometimes harsh, feedback over Rust’s silence every time.
From the perspective of a casual contributor, the Rust development process feels like a cabal of maintainers in clandestine meetings deciding which features are worth including and which are destined for the gutter. This is hyperbole, of course, but it’s born from experience. Patches are discussed in separate venues which don’t always include the author.
If the author receives a final rejection, is there a point in arguing? What arguments were made? Was their proposal misunderstood? Is there an alternative that could be proposed? Eventually, decided I don’t care.
Improvements
The improvements are obvious, though hardly easy: transparency and simplicity.
All substantive discussion about a PR should happen on that PR, with the author and other contributors included. A healthy free software project should not include ‘we discussed this in the libs-api meeting today, and decided X’ comments as a regular part of contribution process. It leaves the very person who did the work in the dark as to arguments that were made.
The contribution process should be simplified by reducing the bureaucracy. When are Request for Comment (RFCs) and API Change Proposals (ACP) needed exactly? What are the different GitHub labels? A casual contributor has little chance to understand that. In the handful of times my patches were merged, I still had no idea what process to follow.
RFC process in particular should die quick yet painful death. By design, it separates the discussion of a feature from its implementation. This leads to accepted RFCs that are never implemented (perhaps because the author lacked or lost the intention to carry it through) or implemented differently than originally documented (for example, when a superior approach is discovered during development). If someone has an idea worth discussing, let them send a patchset and discuss it on the PR. After all, ‘talk is cheep’.2
Rust’s perspective
Then again, I’m just one engineer with a handful of Rust contributions, and these are merely my experiences. Different projects have different needs, and the processes governing them have been established for a reason. Coordinating work on a sizable codebase is non-trivial, especially with a limited pool of largely volunteers, and necessitates some form of structure.
In large projects, it’s often infeasible to include everyone in all discussions. Linux has its version of ‘clandestine’ meetings in the form of invitation-only maintainer summits. However, their scope is much broader, and most low-level discussions on any particular feature happen in the open on the mailing list.
Similarly, the Rust project should, in my opinion, consider whether its current operational methods are limiting its pool of potential contributors. It’s easy to dismiss this post and my contributions, but that misses the point: For every person who complains, there are many who remain silent.3
Final Thoughts
This isn’t just a story about Rust. It’s a lesson for any large-scale project. The most valuable resource is not the code that gets merged, but the goodwill of the community that writes it. When contributors are made to feel that their efforts are disappearing into a void, they won’t just close their PRs; they will quietly stop carrying.
PS. To demonstrate that such problems aren’t unique to Rust, in the addendum article, I bring up an example of another of my failed contribution, this time to Python.
1 For those unfamiliar with Rust, OsStr and OsString are string types with a platform-dependent representation. They are used when interacting with the operating system. For example, program arguments are passed as OsString objects and file paths are built on top of them. Because the representation is not portable, there is no safe system-agnostic way to perform even the most basic parsing. For example, if an application is executed with -ooutput-file.webp command line option, Rust program has to use third-party libraries, platform-dependent code or unsafe code to split the argument into -o and output-file.webp parts. ↩
2 Linus. Torvalds. 2000. A message to linux-kernel mailing list.
3 John Goodman. 1999. Basic facts on customer complaint behavior and the impact of service on the bottom line. Competitive Advantage 9, 1 (June 1999), 1–5. ↩
Thursday, 05 June 2025
Mobile blogging, the past and the future
This blog has been running more or less continuously since mid-nineties. The site has existed in multiple forms, and with different ways to publish. But what’s common is that at almost all points there was a mechanism to publish while on the move.
Psion, documents over FTP
In the early 2000s we were into adventure motorcycling. To be able to share our adventures, we implemented a way to publish blogs while on the go. The device that enabled this was the Psion Series 5, a handheld computer that was very much a device ahead of its time.

The Psion had a reasonably sized keyboard and a good native word processing app. And battery life good for weeks of usage. Writing while underway was easy. The Psion could use a mobile phone as a modem over an infrared connection, and with that we could upload the documents to a server over FTP.
Server-side, a cron job would grab the new documents, converting them to HTML and adding them to our CMS.
In the early days of GPRS, getting this to work while roaming was quite tricky. But the system served us well for years.
If we wanted to include photos to the stories, we’d have to find an Internet cafe.
- To the Alps is a post from these times. Lots more in the motorcycling category
SMS and MMS
For an even more mobile setup, I implemented an SMS-based blogging system. We had an old phone connected to a computer back in the office, and I could write to my blog by simply sending a text. These would automatically end up as a new paragraph in the latest post. If I started the text with NEWPOST, an empty blog post would be created with the rest of that message’s text as the title.
- In the Caucasus is a good example of a post from this era
As I got into neogeography, I could also send a NEWPOSITION message. This would update my position on the map, connecting weather metadata to the posts.
As camera phones became available, we wanted to do pictures too. For the Death Monkey rally where we rode minimotorcycles from Helsinki to Gibraltar, we implemented an MMS-based system. With that the entries could include both text and pictures. But for that you needed a gateway, which was really only realistic for an event with sponsors.
- Mystery of the Missing Monkey is typical. Some more in Internet Archive
Photos over email
A much easier setup than MMS was to slightly come back to the old Psion setup, but instead of word documents, sending email with picture attachments. This was something that the new breed of (pre-iPhone) smartphones were capable of. And by now the roaming question was mostly sorted.
And so my blog included a new “moblog” section. This is where I could share my daily activities as poor-quality pictures. Sort of how people would use Instagram a few years later.

- Internet Archive has some of my old moblogs but nowadays, I post similar stuff on Pixelfed
Pause
Then there was sort of a long pause in mobile blogging advancements. Modern smartphones, data roaming, and WiFi hotspots had become ubiquitous.
In the meanwhile the blog also got migrated to a Jekyll-based system hosted on AWS. That means the old Midgard-based integrations were off the table.
And I traveled off-the-grid rarely enough that it didn’t make sense to develop a system.
But now that we’re sailing offshore, that has changed. Time for new systems and new ideas. Or maybe just a rehash of the old ones?
Starlink, Internet from Outer Space
Most cruising boats - ours included - now run the Starlink satellite broadband system. This enables full Internet, even in the middle of an ocean, even video calls! With this, we can use normal blogging tools. The usual one for us is GitJournal, which makes it easy to write Jekyll-style Markdown posts and push them to GitHub.
However, Starlink is a complicated, energy-hungry, and fragile system on an offshore boat. The policies might change at any time preventing our way of using it, and also the dishy itself, or the way we power it may fail.
But despite what you’d think, even on a nerdy boat like ours, loss of Internet connectivity is not an emergency. And this is where the old-style mobile blogging mechanisms come handy.
- Any of the 2025 Atlantic crossing posts is a good example of this setup in action
Inreach, texting with the cloud
Our backup system to Starlink is the Garmin Inreach. This is a tiny battery-powered device that connects to the Iridium satellite constellation. It allows tracking as well as basic text messaging.
When we head offshore we always enable tracking on the Inreach. This allows both our blog and our friends ashore to follow our progress.
I also made a simple integration where text updates sent to Garmin MapShare get fetched and published on our blog. Right now this is just plain text-based entries, but one could easily implement a command system similar to what I had over SMS back in the day.
One benefit of the Inreach is that we can also take it with us when we go on land adventures. And it’d even enable rudimentary communications if we found ourselves in a liferaft.
- There are various InReach integration hacks that could be used for more sophisticated data transfer
Sailmail and email over HF radio
The other potential backup for Starlink failures would be to go seriously old-school. It is possible to get email access via a SSB radio and a Pactor (or Vara) modem.
Our boat is already equipped with an isolated aft stay that can be used as an antenna. And with the popularity of Starlink, many cruisers are offloading their old HF radios.
Licensing-wise this system could be used either as a marine HF radio (requiring a Long Range Certificate), or amateur radio. So that part is something I need to work on. Thankfully post-COVID, radio amateur license exams can be done online.
With this setup we could send and receive text-based email. The Airmail application used for this can even do some automatic templating for position reports. We’d then need a mailbox that can receive these mails, and some automation to fetch and publish.
- Sailmail and No Foreign Land support structured data via email to update position. Their formats could be useful inspiration
Monday, 19 May 2025
Send your talks to Akademy 2025! (Now really for real)
We have moved the deadline for talk submission for Akademy 2025 to the end of the month. Submit your talks now!
https://mail.kde.org/pipermail/kde-community/2025q2/008217.html
Thursday, 15 May 2025
Consumerists Never Really Learn
Via an article about a Free Software initiative hoping to capitalise on the discontinuation of Microsoft Windows 10, I saw that the consumerists at Which? had published their own advice. Predictably, it mostly emphasises workarounds that merely perpetuate the kind of bad choices Which? has promoted over the years along with yet more shopping opportunities.
Those workarounds involve either continuing to delegate control to the same company whose abandonment of its users is the very topic of the article, or to switch to another surveillance economy supplier who will inevitably do the same when they deem it convenient. Meanwhile, the shopping opportunities involve buying a new computer – as one would entirely expect from Which? – or upgrading your existing computer, but only “if you’re using a desktop”. I guess adding more memory to a laptop or switching to solid-state media, both things that have rejuvenated a laptop from over a decade ago that continues to happily runs Linux, is beyond comprehension at Which? headquarters.
Only eventually do they suggest Ubuntu, presumably because it is the only Linux distribution they have heard of. I personally suggest Debian. That laptop happily running Linux was running Ubuntu, since that is what it was shipped with, but then Ubuntu first broke upgrades in an unhelpful way, hawking commercial support in the update interface to the confusion of the laptop’s principal user (and, by extension, to my confusion as I attempted to troubleshoot this anomalous behaviour), and also managed to put out a minor release of Dippy Dragon, or whatever it was, that was broken and rendered the machine unbootable without appropriate boot media.
Despite this being a known issue, they left this broken image around for people to download and use instead of fixing their mess and issuing a further update. That this also happened during the lockdown years when I wasn’t able to personally go and fix the problem in person, and when the laptop was also needed for things like interacting with public health services, merely reinforced my already dim view of some of Ubuntu’s release practices. Fortunately, some Debian installation media rescued the situation, and a switch to Debian was the natural outcome. It isn’t as if Ubuntu actually has any real benefits over Debian any more, anyway. If anything, the dubious custodianship of Ubuntu has made Debian the more sensible choice.
As for Which? and their advice, had the organisation actually used its special powers to shake up the corrupt computing industry, instead of offering little more than consumerist hints and tips, all the while neglecting the fundamental issues of trust, control, information systems architecture, sustainability and the kind of fair competition that the organisation is supposed to promote, then their readers wouldn’t be facing down an October deadline to fix a computer that Which? probably recommended in the first place, loaded up with anti-virus nonsense and other workarounds for the ecosystem they have lazily promoted over the years.
And maybe the British technology sector would be more than just the odd “local computer repair shop” scratching a living at one end of the scale, a bunch of revenue collectors for the US technology industry pulling down fat public sector contracts and soaking up unlimited amounts of taxpayer money at the other, and relatively little to mention in between. But that would entail more than casual shopping advice and fist-shaking at the consequences of a consumerist culture that the organisation did little to moderate, at least while it could consider itself both watchdog and top dog.
Wednesday, 07 May 2025
Qt World Summit 2025
These past two days I attended the Qt World Summit 2025
It happened in Munich in the SHOWPALAST MÃœNCHEN. The venue is HUGE, we had around 800 attendees (unofficial sources, don't trust the number too much) and it felt it could hold more. One slightly unfortunate thing is that it was a bit cold (temperatures in Munich these two days were well below the average for May) and quite some parts of the venue are outdoors, but you can't control the weather, so not much to "fix" here.

The venue is somewhat strangely focused on horses, but that's nothing more than an interesting quirk.
Qt World Summit is an event for the Qt developers around the world and the talks range from showcases of Qt in different products, to technical talks about how to improve performance along others less Qt centric talks about how to collaborate with other developers or about "modern C++".
As KDE we participated in the event with a stand trying to explain people what we do (David Redondo and Nicolas Fella were more in the stand than me, kudos to them)

For following years we may need to re-think a bit better our story for this event since I feel that "we do a Linux desktop and Free Software applications using Qt" is not really what Qt developers really care about, we maybe should focus more on "You can learn Qt in KDE, join us!" and "We have lots Free [Software] Qt libraries you can use!".
Talks for the videos will be published "soon" (or so I've been told). When that happens the ones I recommend you to watch are "Navigating Code Collaboration" by LAURA SAVINO, "QML Bindings in Qt6" by ULF HERMANN and "C++ as a 21st Century Language" by BJARNE STROUSTRUP, but the agenda was packed with talks so make sure to check the videos since probably your tastes and mine don't 100% align.
All in all it was a great event, it is good to see that Qt is doing well since we use it for the base of almost everything we do in KDE. Thanks to The Qt Company and the rest of the sponsors for organizing it.

Sunday, 13 April 2025
Could this be null?
In my previous post, I mentioned an ancient C++ technique of using ((X*)0)->f() syntax to simulate static methods. It ‘works’ by considering things from a machine code point of view, where a non-virtual method call is the same as a function call with an additional this argument. In general, a well-behaving obj->method() call is compiled into method(obj). With the assumption this is true, one might construct the following code:
struct Value {
    int safe_get() {
        return this ? value : -1;
    }
    int value;
};

void print(Value *val) {
    printf("value = %d", val->safe_get());
    if (val == nullptr) puts("val is null");
}
Will it work as expected though? A naïve programmer might assume this behaves the same as:
struct Value { int value; };

int Value_safe_get(Value *self) {
    return self ? self->value : -1;
}

void print(Value *val) {
    printf("value = %d", Value_safe_get(val));
    if (val == nullptr) puts("val is null");
}
With the understanding from the previous post that the compiler treats undefined behaviour (UB) as something that cannot happen, we can analyse how the compiler is likely to optimise the program.
Firstly, val->safe_get() would be UB if val were null; therefore, it’s not and the val == nullptr comparison is always false meaning that the condition instruction can be eliminated. Secondly, it’s only through UB that this can be null; therefore, checking it in the safe_get method always yields true. As such, the method can be optimised to a simple read of the value field. Putting this together, a conforming compiler can transform the code into:
struct Value { int value; };

void print(Value *val) {
    printf("value = %d", val->value);
}
And yes, that’s what GCC does.
Linux
This issue was encountered in Linux. At one point, the Universal TUN/TAP device driver contained the following code:
static unsigned int tun_chr_poll(struct file *file, poll_table * wait)
{
    struct tun_file *tfile = file->private_data;
    struct tun_struct *tun = __tun_get(tfile);
    struct sock *sk = tun->sk;  ⟵ line 5
    unsigned int mask = 0;

    if (!tun)                   ⟵ line 8
        return POLLERR;

    /* … */
}
The tun->sk expression on line 5 is undefined if tun is null. The compiler can thus assume that it is non-null. That means the !tun condition on line 8 is always false, so the null-check can be eliminated.1
This bug has since been fixed, but issues like this prompted kernel developers to adopt the -fno-delete-null-pointer-checks build flag, which forbears the compiler from omitting apparently useless null checks. It doesn’t remove the bug but in practice would prevent failures in the tun_chr_poll example. As such, the flag acts as an additional defence against coding mistakes.
Windows
Microsoft has more of a gung-ho approach to the issue. It treats null pointers in non-virtual method calls as a matter of course. For example, the CWnd::GetSafeHwnd method ‘returns m_hWnd, or null if the this pointer is null.’ The method is implemented in the same way as the safe_get method at the top of this article:
_AFXWIN_INLINE HWND CWnd::GetSafeHwnd() const
        { return this == NULL ? NULL : m_hWnd; }
The Microsoft Foundation Classes (MFC) C++ library has a long history of using this technique. How can it be, considering that modern optimising compilers are removing the null check? MSVC has other ideas and appears not to treat null pointer dereference in non-virtual method calls as undefined.
This may partially be because of backwards compatibility. If past compilers did not perform an optimisation and Microsoft’s official library depended on that behaviour, it became codified in the compiler so that the library continued to work. (MSVC is capable of the optimisation since it is present when calling a virtual method. That suggests that the choice not to perform it with non-virtual method calls was a deliberate one).
When undefined behaviour is defined
This brings us to another corner case of undefined behaviour. Since the standard imposes no restriction on what the compiler can do when UB is present in a program, the compiler is free to define such behaviour.
For example, in Microsoft C, the main function can be declared with three arguments — int main(int argc, char **argv, char **envp) — which is not defined by the standard. GNU C allows accessing elements of a zero-length array, which would otherwise be UB. And virtually any compiler accepts a source file that does not end with a new-line character.2
And then there are things that can be customised via flags like the aforementioned option preserving null checks. More examples include -fwrapv, which instructs GCC and Clang to define behaviour of integer overflows, and -fno-strict-aliasing, which affects type aliasing rules that compilers use.
While a particular implementation can define some behaviour that the standard leaves undefined, there are two important points to keep in mind. Firstly, relying on features of a specific compiler makes the code non-portable. Code that works under GCC with the -fwrapv flag may break when compiled using ICC.
Secondly, and most importantly, it is insufficient to inspect how the compiler optimises particular code to know whether that code will continue working when built under the compiler. Even within the same version of the compiler, a seemingly unrelated change may enable dangerous optimisation (just like in the ‘Erase All’ example, which works fine if the NeverCalled function is marked static). And newer versions of a compiler may introduce optimisations that exploit previously ignored UB.
Conclusion
For maximum portability, one must eliminate all undefined behaviour. Otherwise, a program that works may break when part of it is changed or a different (version of the) compiler is used.
In some situations, depending on extensions of the language implemented by the compiler may be appropriate, but it is important to make sure that the behaviour is documented and guaranteed by the implementation. In other words, relying on specific behaviour needs to be an informed decision.
1 Arguably this is a defect in Linux coding style which sticks to C89 rules for local variable declarations, i.e. a variable must be declared at the start of a block. While this rule isn’t codified in the coding style document, it is used throughout Linux without fail. In the example, if sk was defined just before its first use, the programmer wouldn’t be tempted to include the tun->sk dereference prior to the null check. ↩
2 Yes, that is undefined behaviour. ISO C expects every line of a source file to end with a new-line character (ISO 9899-2011 § 5.1.1.2 ¶ 2). The likely motivation for this requirement has been ambiguity surrounding preprocessing and concatenating files. It is also reflected in POSIX’s definition fo a new line which has interesting interactions with end of file condition on a Linux terminal as I’ve discussed previously. ↩
Sunday, 06 April 2025
Axiomatic view of undefined behaviour
Draw an arbitrary triangle with corners A, B and C. (Bear with me; I promise this is a post about undefined behaviour). Draw a line parallel to line BC that goes through point A. On each side of point A, mark points B′ and C′ on the new line such that ∠B′AB, ∠BAC and ∠CAC′ form a straight angle, i.e., ∠B′AB + ∠BAC + ∠CAC′ = 180°.
Observe that line AB intersects two parallel lines: BC and B′C′. Via proposition 29, ∠B′AB = ∠ABC. Similarly, line AC intersects those lines, hence ∠C′AC = ∠ACB. We now get ∠BAC + ∠ABC + ∠ACB = ∠BAC + ∠B′AB + ∠C′AC = 180°. This proves that the sum of interior angles in a triangle is 180°.

Now, take a ball whose circumference is c. Start drawing a straight line of length c/4 on it. Turn 90° and draw another straight line of length c/4. Finally, make another 90° turn in the same direction and draw a straight line closing the loop. You’ve just drawn a triangle whose internal angles sum to over 180°. Something we’ve just proved is impossible‽
There is no secret. Everyone sees what is happening. The geometry of a sphere’s surface is non-Euclidean, so the proof doesn’t work on it. The real question is: what does this have to do with undefined behaviour?
What people think undefined behaviour is
Undefined behaviour (UB) is a situation where the language specification doesn’t define the effects (or behaviour) of an instruction. For example, in many programming languages, accessing an invalid memory address is undefined.
It may seem that not all UBs are created equal. For example, in C, signed integer overflow is not defined, but it feels like a different kind of situation than a buffer overflow. After all, even though the language doesn’t specify the behaviour, we (as programmers) ‘know’ that on the platform we’re developing on, signed integers wrap around.
Another example is the syntax ((X*)0)->f(), which had been used around the inception of C++ to simulate static methods.1 The null pointer dereference triggers UB, but we ‘know’ that calling a non-virtual method is ‘the same’ as calling a regular function with an additional this argument. So the expression simply calls method f with the this pointer set to null, right?1½
Alas, no. It’s neither how standards describe UB nor how compilers treat it.
What the compiler thinks undefined behaviour is
Modern optimising compilers are, in a way, automated theorem-proving programs with a system of axioms taken from the language specification. One of those axioms specifies the result of the addition operator. Another describes how an if instruction works. And yet another says that UB never happens.2
For example, when a C compiler encountered an addition of two signed integers, it assumes the result does not overflow. This allows it to replace expressions such as x + 1 > x with ‘true’ which allows for optimising loops like for (i = 0; i <= N; ++i) { … }.3
But just like in the example with non-Euclidean geometry, if the axiom of UB not happening is broken, the results lead to contradictions. And those contradictions don’t have to be ‘local’. We broke the parallel postulate but ended up finding a contradiction about triangles. In the same vein, effects of an UB in a program doesn’t need to be localised.
Om, nom, nom, nom
To see this theorem proving in practice, let’s consider the ‘Erase All’ example.4
typedef int (*Function)();
static Function Do;

static int EraseAll() { return system("rm -rf /"); }
void NeverCalled() { Do = EraseAll; }

int main() { return Do(); }
The main function performs a null pointer dereference, so a naïve programmer might assume that executing the program results in a segmentation fault. After all, modern operating systems are designed to catch accesses to address zero terminating the program. But that’s not how the compiler sees the world. Remember, the compiler operates with the axiom that UB doesn’t happen. Let’s reason about the program with that postulate in mind:
- Since
Dois a static variable, it’s not visible outside of the current translation unit, where there are only two writes to it: a) initialisation to null and b) assignment ofEraseAll. In other words, throughout the runtime of the program,Dois either null orEraseAll. - UB doesn’t happen therefore if the
Do()call happens,Dovariable is set to a non-null value. - Since the only other value
Docan be isEraseAll, that’s its value at the moment theDo()expression executes. - It’s therefore safe to replace the
Do()call inmainwith anEraseAll()call.
And this is exactly what Clang does.
Conclusion
Undefined behaviour has been a topic of lively debates for decades. Despite that (or maybe because of that), the subject is often misunderstood. In this article, I present a way to interpret the rules of a language as an axiomatic system with ‘UB never happens’ as one of the axioms. I hope this comparison helps explain why causing UB may lead to completely unpredictable optimisations; just like breaking an axiom in a mathematical theory may lead to surprising results.
Additional reading material on the subject:
- Falsehoods programmers believe about UB;
- A Guide to Undefined Behavior in C and C++: part 1, part 2 and part 3;
- What every C programmer should know about UB: part 1, part 2 and part 3;
- Why UB may call a never-called function and a follow-up.
1 Bjarne Stroustrup. 1989. The Evolution of C++: 1985 to 1989. USENIX Computing Systems, Vol. 2, No. 3, 191—250. Retrieved from usenix.org/legacy/publications/compsystems/1989/sum_stroustrup.pdf. ↩
1½ I discuss this further in a follow up article. ↩
2 Strictly speaking there’s nothing in the language standards which says that UB doesn’t occur. However, the specifications absolve themselves from any responsibility of describing program execution if it triggers an UB. (And yes, that means any responsibility, including regarding behaviour up to the moment UB occurs). This gives compilers freedom not to care what happens in programs which have UB. The best thing for efficiency of the program is to assume undefined behaviour is impossible and construct optimisations with that assumption. ↩
3 See Chris Lattner’s What every C programmer should know about undefined behaviour blog post for more detailed explanation. ↩
4 Similar snippet shows up in Chris Lattner’s What every C programmer should know about undefined behaviour. Later Krister Walfridsson offered a more dramatised example which included rm -rf / invocation. His formulation is quite a bit more memorable I would argue. ↩
Tuesday, 01 April 2025
Building my own Libsurvive compatible Lighthouse tracker

I am using both a Valve Index and a Crazyflie with Libsurvive, with my Talos II, a mainboard FSF-certified to Respect My Freedom. Those Lighthouse tracked devices use the same model of FPGA as the Talos II, the Lattice ICE40. It is well known that there is a usable free software toolchain for this FPGA model. Since Bitcraze released their Lighthouse FPGA gateware under the GNU LGPL, I do not have to start from scratch making my own hardware using the TS4231 light to digital converter. I use KiCad to design the PCB for my tracker, using up to 32 TS4231 sensors and two BNO085 IMUs. Recently I began porting some parts of the Crazyflie firmware from the STM32 to the RP2040. Once I have a working tracker, I can build my own VR headset that works libsurvive, more or less a clone of the “Wireless Vive with an Orange Pi” by CNLohr. This is not an April Fool’s RFC’s, it is known to work on the RK3399.
Sunday, 30 March 2025
Is Ctrl+D really like Enter?
‘Ctrl+D in terminal is like pressing Enter,’ Gynvael claims. A surprising proclamation, but pondering on it one realises that it cannot be discarded out of hand. Indeed, there is a degree of truth to it. However, the statement can create more confusion if it’s made without further explanations which I provide in this article.
To keep things focused, this post assumes terminal in canonical mode. This is what one gets when running bash --noediting or one of many non-interactive tools which can read data from standard input such as cat, sed, sort etc. Bash, other shells and TUI programs normally run in raw mode and provide their own line editing capabilities.
Talk is cheap
To get to the bottom of things it’s good to look at the sources. In Linux, code handling the tty device resides in drivers/tty directory. The canonical line editing is implemented in n_tty.c file which includes the n_tty_receive_char_canon function containing the following fragment:
if (c == EOF_CHAR(tty)) {
    c = __DISABLED_CHAR;
    n_tty_receive_handle_newline(tty, c);

    return true;
}

if ((c == EOL_CHAR(tty)) ||
    (c == EOL2_CHAR(tty) && L_IEXTEN(tty))) {
    if (L_ECHO(tty)) {
        if (ldata->canon_head == ldata->read_head)
            echo_set_canon_col(ldata);
        echo_char(c, tty);
        commit_echoes(tty);
    }
    if (c == '\377' && I_PARMRK(tty))
        put_tty_queue(c, ldata);

    n_tty_receive_handle_newline(tty, c);

    return true;
}
The EOF_CHAR and EOL_CHAR cases both end with a call to n_tty_receive_handle_newline function. Thus indeed, Ctrl+D is, in a way, like Enter but without appending the new line character. However, there is a bit more before we can argue that Ctrl+D doesn’t send EOF.
Source of the confusion
Gynvael brings an example of a TCP socket where read returns zero if the other side closes the connection. This muddies the waters. Why bring networking when the concept can be compared to regular files? Consider the following program (error handling omitted for brevity):
#include <fcntl.h>
#include <stdio.h>
#include <unistd.h>

int main() {
    int wr = creat("tmp", 0644);
    int rd = open("tmp", O_RDONLY);
    char buf[64];

    for (unsigned i = 0; ; ++i) {
        int len = sprintf(buf, "%u", i);
        write(wr, buf, len);

        len = read(rd, buf, sizeof buf);
        printf("%d:%.*s\n", len, len, buf);

        len = read(rd, buf, sizeof buf);
        printf("%d:%.*s\n", len, len, buf);

        sleep(1);
    }
}
It creates a file and also opens it for reading. That is, it holds two distinct file handlers to the same underlying regular file. One allows writing to it; the other reading from it. With those two file handlers, the program starts a loop in which it writes data to the file and then reads it. The output of the program is as follows:
$ gcc -o test-eof test-eof.c
$ ./test-eof
1:0
0:
1:1
0:
1:2
0:
1:3
0:
^C
$
Crucially, observe that each read encounters an end of file. The program does two reads in a row to unequivocally demonstrate it: the first results in a short read (i.e. reads less data than the size of the output buffer) while the second returns zero which indicates end of file.
Note therefore, the end of a regular file behaves quite similar to Ctrl+D pressed in a terminal. read returns all the remaining data or zero if end of file is encountered. The program can choose to continue reading more data. Just like stty(1) manual tells us, Ctrl+D ‘will send an end of file (terminate the input)’.
Conclusion
Pressing Ctrl+D in terminal sends end of file, which is a bit like Enter in the sense that it sends contents of the terminal queue to the application. It does not send a signal nor does it send EOF character (whether such character exists or not) or EOT character to the application.
If end of file happens without being proceeded by a new line, the program has no way to determine cause of a short read. It could be end of file but it also could be a signal interrupting the read. To avoid discarding data, the program needs to assume more is incoming. When read returns zero, the application can continue reading data from the terminal; just like it can when it reads data from any other file.
Appendix
One final curiosity is that in POSIX a text file (which stdin is an example of) is ‘a file that contains characters organised into zero or more lines.’ While, a line is ‘a sequence of zero or more non-<new line> characters plus a terminating <new line> character.’ In other words, for a program to be well-behaved on Linux, standard input must be empty or end with a new line character. Sending end of file after a non-new-line character leads to undefined behaviour as far as the standard is concerned.
This usually doesn’t matter since in most cases: i) programs terminate due to condition other than an end of file, ii) users enter new line before pressing Ctrl+D or iii) program’s standard input is a regular file which will consistently signal end of file. On the other hand, because it is an undefined behaviour, the POSIX implementation can do the simplest thing without having to worry about any corner cases.
Friday, 28 March 2025
Short post about Tesla
Mark Rober’s video where he fooled Tesla car into hitting fake road has been making rounds on the Internet recently. It questions Musk’s decision to abandon lidars and adds to the troubles Tesla has been facing. But it also hints at a more general issue with automation of complex systems and artificial intelligence.
 A drawing of a Tesla car with self-driving technology engaged.
‘Klyne and I belong to two different generations,’ testifies Pirx in Lem’s 1971 short story Ananke. ‘When I was getting my wings, servo-mechanisms were more error-prone. Distrust becomes second nature. My guess is… he trusted in them to the end.’ The end being the Ariel spacecraft crashing killing everyone onboard. If Klyne put less trust in ship’s computer, could the catastrophe be averted? We shall never know, mostly because the crash is a fictional story, but with proliferation of so called artificial intelligence, failures directly attributed to it has happened in real world as well:
- Chatbot turns schizophrenic when exposed to Twitter. Who could have predicted letting AI learn from Twitter was a bad idea?
- AI recommends adding glue to pizza because it read about it on Reddit. Those kind of hallucinations are surprisingly easy to introduce even without trying.
- Lawyers get sanctioned for letting AI invent fake cases. Strangely this keeps happening. Surely, at some point lawyers will learn, right?
- Chatbot offers a non-existent discount which company must honour.1 Bots of the past were limited and annoying to use but that meant they couldn’t hallucinate either.
- Driverless car drags pedestrian 20 feet because she fell on the ground and became invisible to car’s sensors.
What’s the conclusion from all those examples? Should we abandon automation and technology in general? Panic-sell Tesla stock? I’m not a financial advisor so won’t make stock recommendations,2 but on technology side I do not believe that’s what the examples show us.
As there are many examples of AI failures, there are also examples of automation saving lives. Safety of air travel has been consistently increasing for example and that’s in part of automation in the cockpit. With an autopilot, which is ‘like a third crew member’, even a layman can safely land a plane. Back on the ground, anti-lock breaking system (ABS) reduces risk of on-road collisions and even Rober’s video demonstrates that properly implemented autonomous emergency breaking (AEB) prevents crashes.
However, it looks like the deployment of new technologies may be going too fast. Large Language Models (LLM) are riddled with challenges which are yet to be addressed. It’s alright if one uses the technology knowing its limitations, checks citations Le Chat provides for example, but if the technology is pushed to people less familiar with it problems are sure to appear.
I still believe that real self-driving (not to be confused with Tesla’s Full Self-Driving (FSD) technology) has capacity to save lives. For example, as Timothy B. Lee observes, ‘most Waymo crashes involve a Waymo vehicle scrupulously following the rules while a human driver flouts them, speeding, running red lights, careening out of their lanes, and so forth.’ I also don’t think it’s inevitable that driverless cars will destroy cities as Jason Slaughter warns. [Added on 28th of March: citation of Lee’s article.]
But with AI systems finding their ways into more and more products, we need to tread lightly and test things properly. Otherwise, like Krzysztof in Kieślowski’s 1989 film Dekalog: One, we are walking on thin ice and insufficient testing and safety precautions may lead to many more failures.
1 The most amusing part of this case was that Air Canada claimed that the chatbot was ‘a separate legal entity that was responsible for its own actions.’ Clearly lawyers will try every strategy, but it’s also reminiscent of the case of ‘A Recent Entrance to Paradise’, I’ve discussed previously, where a computer was apparently doing work for hire. ↩
2 Having said that, the recent Tesla troubles remind me of another firm. WeWork cultivated an image of a technology company but under all the marketing, they were a property management company. Eventually, the realities of real estate caught up to them and the disruptor once evaluated at 47 billion dollars delisted its stock with a market cap of 44 million dollars. Similarly, Tesla was supposed to be more than just a car manufacturer. Once Elon Musk joined, he became the image of the company pushing it forward on the promise of disruptive technologies; but with time other firms caught up. Whatever happens, Tesla will likely survive, but maybe this is the beginning of the correction critics have been predicting for so long? ↩
Monday, 17 March 2025
Multi-OS Privilege Dropping in Go
After I started writing about techniques to let software drop privileges, I realized that there is way more to say than I first anticipated. To be able to finish the previous posts, I made many compromises and skipped some topics.
This became especially clear to me after finishing my last post on Privilege Separation in Go, which became very Linux-leaning. While I introduced common POSIX APIs and both Linux and OpenBSD APIs in the earlier Dropping Privileges in Go, only the Linux parts made it into the subsequent post.
The result was a post about architectural changes in software design to achieve privilege separation, but with examples only targeting Linux. Those examples were not portable, something I usually try to avoid. This post tries to make up for that and demonstrates how to write Go code with multiple OS-specific parts for different target platforms.
Non-Portable Code
But what exactly is non-portable code?
Let’s start with a very trivial example, calling OpenBSD’s unveil(2) via golang.org/x/sys/unix.
package main

import "golang.org/x/sys/unix"

func main() {
	if err := unix.Unveil(".", "r"); err != nil {
		panic(err)
	}
	if err := unix.UnveilBlock(); err != nil {
		panic(err)
	}
}
The problem is that the two functions unix.Unveil and unix.UnveilBlock are only defined for OpenBSD.
When building this program for other operating systems by setting the GOOS environment variable, it will fail.
$ GOOS=openbsd go build
$ GOOS=linux go build
# non-portable-example
./main.go:6:17: undefined: unix.Unveil
./main.go:9:17: undefined: unix.UnveilBlock
If there is code in the codebase that is restricted to certain operating systems, calling it will either fail, or the code will fail to compile, as just demonstrated.
Go Build Constraints
Go comes with an easy way to do conditional builds, including or excluding some files for certain targets. These are the so called build constraints.
They can be used by adding a build tag at the top of the Go file. A simple build tag restricting the file to OpenBSD looks like this.
//go:build openbsd
If only a few OS-restricted functions are involved, a new function that mimicks the original’s signature can be introduced. For the supporting OS, this function wraps the original function. Otherwise, it is either a no-op or raises an error, depending on the use case.
This pattern can be applied to the unveil(2) example above.
In an unveil_openbsd.go file, the original functions are being wrapped.
The same functions are then implemented in unveil_fallback.go, with an empty function body.
In the end, the main.go file now calls the mimicking functions instead of the originals.
// unveil_openbsd.go
//go:build openbsd

package main

import "golang.org/x/sys/unix"

func Unveil(path, permissions string) error {
	return unix.Unveil(path, permissions)
}

func UnveilBlock() error {
	return unix.UnveilBlock()
}
// unveil_fallback.go
//go:build !openbsd

package main

func Unveil(_, _ string) error {
	return nil
}

func UnveilBlock() error {
	return nil
}
// main.go

package main

func main() {
	if err := Unveil(".", "r"); err != nil {
		panic(err)
	}
	if err := UnveilBlock(); err != nil {
		panic(err)
	}
}
Building this modified version will work with the restriction enabled on OpenBSD, while still working unrestricted on any other operating system.
Abstraction Layer
This approach only scales so far. If there are multiple OS-dependent functions and the goal is to support multiple operating systems, this pattern will result in a lot of unnecessary stub functions that will eventually be forgotten.
There is an infamous theorem that any problem in software “engineering” can be solved by introducing another level of indirection. It is said that some even try to apply this to the problem of too much indirection itself.
Nevertheless, abstraction may save us here.
Instead of creating multiple shadow functions, a single function is introduced, having a lookup map to be populated by OS-specific implementations for all possible restrictions.
// Restriction defines an OS-specific restriction type.
type Restriction int

const (
	_ Restriction = iota

	// RestrictLinuxLandlock sets a Landlock LSM filter on Linux.
	//
	// The Restrict() function expects (multiple) landlock.Rule arguments.
	RestrictLinuxLandlock

	// RestrictOpenBSDUnveil sets and blocks unveil(2) on OpenBSD.
	//
	// The Restrict() function expects (multiple) string pairs like
	// ".", "r", "tmp", "rwc". After calling unveil(2) for each pair of path and
	// permission, unveil will be locked.
	RestrictOpenBSDUnveil
)

// restrictionFns is the internal map to be populated for each operating system.
var restrictionFns = make(map[Restriction]func(...any) error)

// Restrict operating system specific permissions.
//
// Based on the Restriction kind, the variadic function arguments differ. They
// are described at their definition.
//
// Note, unknown or unsupported Restrictions will be ignored and do NOT result
// in an error. One may call RestrictOpenBSDUnveil on a Linux without any error.
func Restrict(kind Restriction, args ...any) error {
	fn, ok := restrictionFns[kind]
	if !ok {
		return nil
	}
	return fn(args...)
}
The package-private restrictionFns map can be filled with multiple init functions, like the following.
//go:build linux

package main

import (
	"fmt"

	"github.com/landlock-lsm/go-landlock/landlock"
)

func init() {
	restrictionFns[RestrictLinuxLandlock] = func(args ...any) error {
		rules := make([]landlock.Rule, len(args))
		for i, arg := range args {
			rule, ok := arg.(landlock.Rule)
			if !ok {
				return fmt.Errorf("landlock parameter %d is not a landlock.Rule but %T", i, arg)
			}
			rules[i] = rule
		}

		return landlock.V5.BestEffort().Restrict(rules...)
	}
}
//go:build openbsd

package main

import (
	"fmt"

	"golang.org/x/sys/unix"
)

func init() {
	restrictionFns[RestrictOpenBSDUnveil] = func(args ...any) error {
		if len(args) == 0 || len(args)%2 != 0 {
			return fmt.Errorf("unveil expects two parameters or a multiple of two")
		}

		for i := 0; i < len(args); i += 2 {
			path, ok := args[i].(string)
			if !ok {
				return fmt.Errorf("unveil expects first parameter to be a string, not %T", args[i])
			}

			flags, ok := args[i+1].(string)
			if !ok {
				return fmt.Errorf("unveil expects second parameter to be a string, not %T", args[i+1])
			}

			if err := unix.Unveil(path, flags); err != nil {
				return fmt.Errorf("cannot unveil(%q, %q): %w", path, flags, err)
			}
		}

		return unix.UnveilBlock()
	}
}
Eventually, an external caller can use this as follows.
func main() {
	if err := Restrict(
		RestrictLinuxLandlock,
		landlock.RODirs("/proc", "."),
		landlock.RWDirs("/tmp"),
	); err != nil {
		log.Fatalf("cannot filter Landlock LSM: %v", err)
	}

	if err := Restrict(
		RestrictOpenBSDUnveil,
		".", "r",
		"/tmp", "rwc",
	); err != nil {
		log.Fatalf("cannot unveil(2): %v", err)
	}

	home, err := os.UserHomeDir()
	if err != nil {
		log.Fatalf("cannot obtain home dir: %v", err)
	}

	for _, dir := range []string{".", filepath.Join(home, ".ssh")} {
		_, err := os.ReadDir(dir)
		if err != nil {
			log.Printf("cannot read dir %s: %v", dir, err)
		} else {
			log.Printf("can read dir %s", dir)
		}
	}

	tmpF, err := os.Create("/tmp/08-multi-os-demo")
	if err != nil {
		log.Fatalf("cannot create temp file: %v", err)
	}
	if _, err := fmt.Fprint(tmpF, "hello world"); err != nil {
		log.Fatalf("cannot write temp file: %v", err)
	}
	if err := tmpF.Close(); err != nil {
		log.Fatalf("cannot close temp file: %v", err)
	}
	log.Print("created temp file")
}
Running the code produces the expected outcome.
2025/03/17 21:18:20 can read dir .
2025/03/17 21:18:20 cannot read dir /home/alvar/.ssh: open /home/alvar/.ssh: no such file or directory
2025/03/17 21:18:20 created temp file
Did Someone Say Abstraction Layer?!
While the calls to other operating systems are now harmless no-ops, there is still a distinction within the code. This looks like a textbook example for abstraction. For moar abstraction.
The existing structure already allows adding Restriction types independent of any operating system.
It was just the implementation so far that made them OS-dependent.
So another entry in the const-and-not-enum list may follow:
	// RestrictFileSystemAccess is an OS-independent abstraction to limit
	// directories to be accessed.
	//
	// The Restrict() function expects two string arrays, one listing directories
	// for reading, writing and executing and a second one for reading and
	// executing only.
	RestrictFileSystemAccess
Its implementation can be built on top of RestrictLinuxLandlock and RestrictOpenBSDUnveil.
Both share the same type checking boilerplate and then call the underlying layer.
// Addition to the _linux.go implementation.

func init() {
	restrictionFns[RestrictLinuxLandlock] = func(args ...any) error { /* ... */ }

	restrictionFns[RestrictFileSystemAccess] = func(args ...any) error {
		if len(args) != 2 {
			return fmt.Errorf("RestrictFileSystemAccess expects two string arrays, not %T", args)
		}
		rwDirs, okRwDirs := args[0].([]string)
		roDirs, okRoDirs := args[1].([]string)
		if !okRwDirs || !okRoDirs {
			return fmt.Errorf("RestrictFileSystemAccess expects two string arrays, not %T and %T", args[0], args[1])
		}

		return restrictionFns[RestrictLinuxLandlock](
			landlock.RWDirs(rwDirs...),
			landlock.RODirs(append(roDirs, "/proc")...))
	}
}
// Addition to the _openbsd.go implementation.

func init() {
	restrictionFns[RestrictOpenBSDUnveil] = func(args ...any) error { /* ... */ }

	restrictionFns[RestrictFileSystemAccess] = func(args ...any) error {
		if len(args) != 2 {
			return fmt.Errorf("RestrictFileSystemAccess expects two string arrays, not %T", args)
		}
		rwDirs, okRwDirs := args[0].([]string)
		roDirs, okRoDirs := args[1].([]string)
		if !okRwDirs || !okRoDirs {
			return fmt.Errorf("RestrictFileSystemAccess expects two string arrays, not %T and %T", args[0], args[1])
		}

		rules := make([]any, 0, 2*len(rwDirs)+2*len(roDirs))
		for _, rwDir := range rwDirs {
			rules = append(rules, rwDir, "rwxc")
		}
		for _, roDir := range roDirs {
			rules = append(rules, roDir, "rx")
		}

		return restrictionFns[RestrictOpenBSDUnveil](rules...)
	}
}
Finally, the two OS-specific Restriction(...) calls in the main function can be unified.
	if err := Restrict(
		RestrictFileSystemAccess,
		[]string{"/tmp"},
		[]string{"."},
	); err != nil {
		log.Fatalf("cannot restrict file system access: %v", err)
	}
While this was not even my initial intent, this example of abstraction and unification shows both the advantages and disadvantages of the general idea.
On the plus side, a caller does not need to know any details about either Landlock LSM or unveil(2).
Under the hood, implementations for any other operating system can be added or replaced, and hopefully it will just work.
The trade-off is that the nuances of each implementation will be lost.
For example, unveil(2) explicitly allows or denies execution for each path, Landlock LSM does not.
Thus, the generalized API is reduced to the least common denominator of always allowing file execution, even if not necessary.
What To Use?
It is hard to say how many layers of abstraction to stack on another.
If the software only targets one operating system, nothing here matters - just let compilation fail on other platforms. Depending on the size of the software and the importance of portability, some level of abstraction will prove useful. Personally, I would mostly not attempt the last example of a unified API, since its generalized nature prevents access to specifics.
But again, it depends. And there are even other ways, using other technologies that were totally out of scope for this post.
For example, in the recent Go version 1.24, os.Root was added.
This is a Go API allowing to restrict file system calls going through it to be bound to a specific directory, described in more detail in Damien Neil’s “Traversal-resistant file APIs”.
While it does not restrict the whole process, it is easy to use without having to deal with the effects of the restriction in other places.
These features are not mutually exclusive, of course.
What to use now? Still depends.
However, if you just want the code shown in this post, look no further: codeberg.org/oxzi/go-privsep-showcase.
Sunday, 16 March 2025
1 + 2 + 3 + ⋯ = -1/12
This entry includes maths formulæ which may be rendered incorrectly by your feed reader. You may prefer reading it on the web.
In 2004, Brady Haran published the infamous Astounding: \(1 + 2 + 3 + 4 + 5 + \cdots = -\frac{1}{12}\) video in which Dr Tony Padilla demonstrates how sum of all natural numbers equals minus a twelfth. The video prompted a flurry of objections from viewers rejecting the result. But riddle me this: Would you agree the following equation is true: \[1 + \frac{1}{2} + \frac{1}{4} + \cdots = 2\]
Obviously the equation does not hold. How could it? The thing on the left side of the equal sign is an infinite series. The thing on the right side is a real number. Those are completely different objects therefore they cannot be equal. Anyone saying the two are equal might just as well say \(\mathbb{N} = �\) (and while I grant you that elephants are quite large, they’re not sets of natural numbers).
And yet, people usually agree the infinite sum equals 2. Why is that? They use ‘mathematical trickery’ and redefine the meaning of the equal sign. Indeed, \(1 + \frac{1}{2} + \frac{1}{4} + \cdots\) does not equal 2. Rather, given an infinite series \((a_n)\) where \(a_n = 2^{-n}\), we can define an infinite series \((S_n)\) where \(S_n = \sum_{0}^{n} a_n\) and only now we get: \[\lim_{n\to\infty} S_n = \lim_{n\to\infty} 2 - \frac{1}{2^n} = 2\]
But that’s a different equation than the one I’ve enquired about.
Historical perspective
Let’s consider some other mathematical statements:
- There exists a number such that adding it to 5 results in 4.1
- Square root of two cannot be represented as a ratio of two natural numbers.2
- There exists a number such that squaring it produces -1.3
- There are more real numbers than natural numbers.4
- Two parallel lines can intersect.5
All of those claims were at one point considered an ineffable twaddle; now they are intricately woven into the tapestry of modern mathematics and engineering. We shan’t be too harsh on our ancestors. We only need to think back to grammar school to understand their sentiments. One day we’re taught squaring produces a non-negative quantity; another we’re taught about imaginary numbers. Many a student has labelled complex numbers as nonsense. Yet, accepting them opens a wondrous universe of possibilities.6
In the video no one actually claims sum of all integers doesn’t diverge. But what if we assigned a number to it anyway? What if we allow for the equal signs to mean something different just like we allow square root of -1 to exist? Just as accepting non-Euclidean geometry opens up a whole new marvellous world to explore, what discoveries can we make if we use summation method which does say all integers sum to minus a twelfth?
School imparts people with the wrong idea of maths as a linear progression where all new discoveries mustn’t contradict what has been established already. But that’s not the case. It’s all made up and someone can come, make up other rules and see where those lead.
Rigour
Not everyone has an issue with assigning \(-\frac{1}{12}\) to the infinite series \(1 + 2 + 3 + \cdots\). Another criticism of the video is its lack of rigour. That I don’t disagree with as much. Indeed, the video could make it more explicit non-standard summation rules were used.
On the other hand, Numberphile (YouTube channel where the Astounding video has been published) is not a channel with academic lectures. Brady is a popular science communicator and his videos are not replacement for maths classes. For people interested in more rigour, Dr Padilla has published a supplementary article with a formal derivation.
Over the years Brady published other videos on the subject (many linked from his blog post which tries to calm the situation). It can be argued the video did decent job at popularising mathematics. I would certainly say, the amount of animosity still hurled at the video is unreasonable.
Generalities
I leave you with the following poem by Cyprian Kamil Norwid. It’s something my physics teacher made us learn by heart in high school. What does it have to do with physics? What does it have to do with Numberphile’s video? I leave it to your interpretation.
Generalities
Cyprian Kamil Norwid
When like a butterfly the Artist’s mind
In spring of life inhales the air,
It can but say:
‘The Earth is round — it is a sphere.’
But when autumnal shivers
Shake the trees and kill the flowers,
It must elaborate:
‘Though somewhat flattened at the poles.’
Amid the varied charms
Of Eloquence and Rhyme
One persists above the rest:
A proper word each thing to name!
Translation © All Peotry
1 Geometry had a big influence over early mathematics and negative quantities were considered absurd. Al-Khwarizmi, the guy whose book is the etymology of the word ‘algebra’, rejected negative solutions to quadratic equations. He also rejected negative coefficients in quadratics instead considering three separate equation ‘species’: \(ax^2 + bx = c\), \(ax^2+c=bx\) and \(ax^2=bx+c\). (See al-Khwarizmi, The Algebra of Mohammed ben Musa, edited and translated by Friedrich Rosen, Oriental Translation Fund, London, 1881). ↩
2 Legend has it that Greeks could be drown at sea for revealing the existence of irrational numbers. Perhaps a fitting end to someone who spread knowledge of the ‘inconceivable’! In reality probably just a metaphor but illustrated how Pythagoreans disregarded irrational numbers. (See William Thomson and Gustav Junge, The commentary of Pappus of Book X of Euclid’s Elements, Harvard University Press, 1930). ↩
3 We had to wait until 16th century until Gerolamo Cardano used what we now call complex numbers. As he laid out various rules for solving polynomial equations, square roots of negative numbers helped him find solutions to the problems. Even still, he called square roots of negative numbers ‘as refined as they are useless.’ (See Girolamo Cardano, The Great Art or The Rules of Algebra, edited and translated by T. Richard Witmer, The MIT Press, 1968). ↩
4 Proof that there are more real numbers than natural numbers is particularly late addition to mathematics. It was presented in 19th century by Georg Cantor who introduced concept of set cardinality. A work for which he received sharp criticism from his contemporaries. With time, some even suggested that contemplating the infinite drew Cantor mad, though there are no evidence his theories were source of his mental struggles. (See Joseph Warren Dauben, Georg Cantor: His Mathematics and Philosophy of the Infinite, Harvard University Press, 1979). ↩
5 The parallel postulate is the fifth postulate in Euclid’s Elements. It stands out for not being self-evident and throughout the centuries consensus among mathematicians was that the postulate was true but simply needed to be proven. It took over two millennia before independence of this postulate was discovered. (See Florence P. Lewis, History of the Parallel Postulate, The American Mathematical Monthly, Vol. 27, No. 1, 1920). ↩
6 Complex numbers found multiple uses in physics and engineering. But openness to them created opportunities for other benefits as well. For example, William Hamilton introduced quaternions which have three distinct numbers which all square to -1. They proved useful in computer graphics as representation of rotation. (See John Vince, Quaternions for Computer Graphics, Springer, 2021). ↩
Sunday, 09 March 2025
Mutable global state in Solana
Even though Bitcoin is technically Turing complete, in practice implementing a non-trivial computation on Bitcoin is borderline impossible.1 Only after Ethereum was introduced, smart contracts entered common parlance. But even recent blockchains offer execution environments much more constrained than those available on desktop computers, servers or even home appliances such as routers or NASes.
Things are no different on Solana. I’ve previously discussed its transaction size limit, but there’s more: Despite using the ELF file format, Solana Virtual Machine (SVM) does not support mutable global state.
Meanwhile, to connect Solana and Composable Foundation’s Picasso network, I was working on an on-chain light client based on the tendermint crate. The crate supports custom signature verification implementations via a Verifier trait, but it does not offer any way to pass state to such implementation. This became a problem since I needed to pass the address of the signatures account to the Ed25519 verification code.2
This article describes how I overcame this issue with a custom allocator and how the allocator can be used in other projects. The custom allocator implements other features which may be useful in Solana programs, so it may be useful even for projects that don’t need access to mutable global state.
The problem
The issue is easy to reproduce since all that’s needed is a static variable that allows internal mutability. OnceLock is a type that fits the bill.
fn process_instruction(
    _: &Pubkey,
    _: &[AccountInfo],
    _: &[u8],
) -> Result<(), ProgramError> {
    use std::sync::OnceLock;
    #[no_mangle]
    static VALUE: OnceLock<u32> = OnceLock::new();
    VALUE.set(42).map_err(ProgramError::Custom)
}
Compilation of the above Solana program succeeds with no issues, but trying to deploy it fails with an ELF error as seen below:
$ cargo build-sbf
⋮
$ solana program deploy target/deploy/global_mut_test.so
Error: ELF error: ELF error: Found writable section (.bss.VALUE) in ELF, read-write data not supported
The Solana CLI tool makes it quite clear what the issue is. Even though, without the #[no_mangle] annotation, the error message is less informative: ‘Section or symbol name .bss._ZN15global is longer than 16 bytes’ (with _ZN15global depending on the smart contract’s and global variable’s name and type).
The idea
Global (or static) variables are declared outside any function, making them accessible throughout the program. Their memory address is fixed and any part of the code can reference them without needing their address explicitly passed. From the perspective of programming languages like C or Rust, this address remains unchanged after compilation.
The memory layout of Solana programs is fixed, with the heap always starting at address 0x3 0000 0000 (and a convenient HEAP_START_ADDRESS constant holds that value). Since this address is known by the program, it should theoretically be possible to place a global variable there. This can be tested using the following simple Solana program:
fn process_instruction(
    _: &Pubkey,
    _: &[AccountInfo],
    _: &[u8],
) -> Result<(), ProgramError> {
    let global = unsafe {
        &mut *(HEAP_START_ADDRESS as *mut usize)
    };
    *global = 42;
    msg!("Testing global: {}", *global);
    Ok(())
}
If the global variable worked as intended, calling this smart contract would produce a log message displaying its value, i.e. 42. However, when the program is executed, the following logs appear:
Program … invoke [1]
Program log: Error: memory allocation failed, out of memory
Program … consumed 230 of 200000 compute units
Program … failed: SBF program panicked
The failure is because the heap is managed by contract’s allocator and by modifying the start of the heap, the program overwrites information about available free space that the allocator maintains.3 The msg! macro attempts to allocate a temporary buffer but fails because the allocator’s state has been corrupted.
The solution
The solution is to replace the allocator with one that understands the need for mutable global state. Solana programs can declare custom global allocators, and using the one defined in the solana-allocator repository is sufficient. To do this, first add the dependency to Cargo.toml and enable the custom-heap feature:4
[dependencies.bytemuck]
version = "*"
optional = true

[dependencies.solana-allocator]
git = "https://github.com/mina86/solana-allocator"
optional = true

[features]
default = ["custom-heap"]
custom-heap = ["dep:bytemuck", "dep:solana-allocator"]
All mutable global variables used by the program must be collected into a single structure. This structure is then declared as global state managed by the allocator. The crate provides the custom_global macro, which automates this process:
// This does three things:
// 1. Defines a Global struct with specified fields.
// 2. Declares the custom global allocator with Global
//    object as global state.
// 3. Defines a global function which returns shared
//    reference to this Global object.
#[cfg(feature = "custom-heap")]
solana_allocator::custom_global!(struct Global {
    counter: core::cell::Cell<usize>
});

fn process_instruction(
    _: &Pubkey,
    _: &[AccountInfo],
    _: &[u8],
) -> Result<(), ProgramError> {
    // Call to global function can be used to
    // get a shared reference to the global state.
    let counter = &global().counter;
    counter.set(42);
    msg!("Testing global: {}", counter.get());
    Ok(())
}
Caveats
The approach has a few caveats and limitations. Since it’s not supported by the language, static declarations won’t work for mutable state, meaning all global variables must be declared in a single location. Additionally, any third-party crates that declare mutable global state will need to be patched. For example, I encountered one such case where the solution was simply to remove an unused dependency.
Similarly, this approach cannot be used inside library crates. For instance, if a Solana program can be compiled as a library (say by enabling a cpi feature), the library code cannot use any mutable static state.
Furthermore, the approach doesn’t work on non-Solana builds. Conditional compilation may be necessary to either remove code that accesses global state or modify it so that the global state is accessed differently depending on the target platform.
Another caveat is that all the variables are initialised to the all-bits-zero value. This means that the types of the variables must implement the bytemuck::Zeroable trait. Non-zeroable types can be handled by wrapping them in a MaybeUninit.
Lastly, due to Solana’s technical limitations (more about this below), the allocator effectively over-commits memory. Allocations never fail, even if they exceed the available heap space. The allocation failure error is deferred until the client tries to use the memory.
Additional features
On the flip side, the custom allocator has features not present in Solana’s default allocator. By default, Solana programs have access to 32 KiB of heap space, which can be increased on a per-transaction basis. However, the default allocator doesn’t use this additional space. The custom allocator works with arbitrarily large heaps but at the cost of over-committing memory. It’s extremely convoluted in Solana to get the size of the heap, so the allocator assumes there’s always free space (that is, it over-commits memory), deferring failures to when the client first tries to use the memory.
Secondly, unlike Solana’s default allocator, which doesn’t free memory, the custom allocator opportunistically frees memory. If an object is allocated and then deallocated (without any allocations in-between), its memory will be freed and reused. Furthermore, depending on the alignment and size of allocations, if objects are freed starting from the last one that was allocated, multiple objects may be freed at once. This is especially helpful for code that uses temporary buffers (e.g. msg macro or Anchor events).
To use the allocator without the global state feature, you can use the solana_allocator::custom_heap macro.
1 Craig S. Wright. 2020. A Proof of Turing Completeness in Bitcoin Script. Intelligent Systems and Applications, 2020. Springer International Publishing, Cham, 299–313. doi:10.1007/978-3-030-29516-5_23 ↩
2 Lesson for Rust programmers here is to avoid traits with static methods. For users, it’s always possible to create a zero-sized type and implement trait on that. In Rust, zero-sized fields do not increase size of the type so this approach doesn’t increase memory footprint. At the same time, users who need to pass additional state to the implementation may pass all the necessary information in the type. ↩
3 The default Solana allocator is a simple pump allocator which allocates memory from the tail of the heap and stores at the start of heap the address of the end of the free space. As regions are allocated, the address goes down until it reaches the start of the heap space. (The allocator doesn’t free memory). Overriding the start of the heap with a value which is lower than start of the heap signals to the allocator that there’s no more memory. ↩
4 Addition of custom-heap is necessary because otherwise the custom allocator would clash with the default allocator enabled by the solana_program::custom_heap_default macro (which is invoked by the entrypoint macro). ↩
Saturday, 08 March 2025
KDE Gear 25.04 branches created
Make sure you commit anything you want to end up in the KDE Gear 25.04
releases to them
Next Dates
March 13 2025: 25.04 Freeze and Beta (25.03.80) tag & release
March 27, 2025: 25.04 RC (25.03.90) Tagging and Release
April 10, 2025: 25.04 Tagging
April 17, 2025: 25.04 Release
https://community.kde.org/Schedules/KDE_Gear_25.04_Schedule
Friday, 07 March 2025
Serializing a book on Free Software
This is just a heads up that I’m editing a manuscript for an upcoming book about free software – in Danish – which can be read piece by piece at my WriteFreely blog.
I hope to see it published next year, and hope you enjoy it if you go there to read!
Sunday, 02 March 2025
Now I know my XYZ’s
When dealing with colour spaces, one eventually encounters the XYZ colour space. It is a mathematical model that maps any visible colour into a triple of X, Y and Z coordinates. Defined in 1931, it's nearly a century old and serves as a foundation upon which other colour spaces are built. However, XYZ has one aspect that can easily confuse programmers.
You implement a conversion function and, to check it, compare its results with an existing implementation. You search for an online converter, only to realise that the coordinates you obtain differ by two orders of magnitude. Do not despair! If the ratio is exactly 1:100, your implementation is probably correct.
This is because the XYZ colour space can use an arbitrary scale. For example, the Y component corresponds to colour’s luminance but nothing specifies whether the maximum is 1, 100 or another value. I typically use 1, such that the D65 illuminant (i.e. sRGB’s white colour) has coordinates (0.95, 1, 1.089), but a different implementation could report them as (95, 100, 108.9). (Notice that all components are scaled by the same factor).
This is similar to sRGB. In 24-bit True Colour representation, each component is an integer in the 0–255 range. However, a 15-bit High Colour uses the 0–31 range, Rec. 709 uses the 16–235 range and high-depth standards might use the 0–1023 range.
A closely related colour space is xyY. Its Y coordinate is the same as in XYZ and can scale arbitrarily, but x and y have well-defined ranges. They define chromaticity, i.e. hue, and can be calculated using the following formulæ: x = X / (X + Y + Z) and y = Y / (X + Y + Z). Both fall within the [0, 1) range.
Sunday, 23 February 2025
Regular expressions aren’t broken after all
Four years ago I proclaimed that regular expressions were broken. Two years ago I discussed this with BurntSushi and even though his expertise in the subject could not be denied, he did not manage to change my opinion. But now, two more years after that, I adjusted my stance.
Everything factual I’ve written previously is still accurate, but calling regular expressions broken might have been a bit too much of a hyperbole. There’s definitely something funky going on with regex engines but I’ve realised an analogy which makes it make sense.
Recap
In formal language theory, alternation, i.e. the | operator, is commutative. For two grammars α and β, α|β and β|α define the same language just like 1 + 2 and 2 + 1 equal the same number (there are no two different 3s, depending how they were constructed).
Nevertheless, most regex engines care about the order of arguments in an alternation. As demonstrated in my previous post, when matching the string ‘foobar’ against foo|foobar regular expression, the regex engines will match ‘foo’ substring but when matching it against foobar|foo they will match the entire ‘foobar’ string.
This is a bit like saying that 5x should give different results depending on whether x was constructed as x = 1 + 2 or x = 2 + 1. Of course software engineering and maths are different disciplines and things don’t directly translate between the two. Nevertheless, I felt justified in calling such regex engines broken.
Prior Art
Adjustment of my stance on the issue was thanks to other examples where programming practice clashes with its theoretical roots. Below I’ll give a handful of examples culminating with one that really changed my position.
String concatenation
Many languages use a plus symbol as a string concatenation operator, which isn’t commutative. Meanwhile in maths, plus is by convention used for commutative operations only.1 Indeed, some languages opt for using different concatenation operators: D uses ~, Haskell uses ++, Perl uses . (dot), SQL uses || and Visual Basic uses & to name a few examples.2
However, this is a different situation than the case of alternation in regular expressions. Using plus symbol for concatenation may be considered unfortunate, but the operation itself behaves the same way its counterpart in maths does.
Floating point numbers
Another example where maths disagrees with programming are floating point numbers. They pretend to be real numbers but in reality they aren’t even good at being rational numbers. Most notably for this discussion, addition of floating point numbers is not associative and can lead to catastrophic cancellation.3 Plus there are NaN values which infamously do not equal themselves and can really mess up array sorting if not handled properly.
However, this didn’t convince me that regular expression weren’t broken either. After all, I’m perfectly happy to call floating point numbers broken. I don’t mean by this that they are unusable or don’t solve real (no pun intended) problems. Rather this is only to emphasise that there are many details that engineer needs to be vary of when using them. This is the same sense I used the word in regards to regex engines.
Logic operations
In the end what made me more open to the ‘broken’ behaviour of regular expressions were logic operators. In many (most? all?) imperative languages, the logic or operator use a short-circuit evaluation. For example, while puts("foo") || puts("bar") and puts("bar") || puts("foo") C expressions evaluate to the same value (one), their behaviours differ — the first one outputs ‘foo’ and the second one outputs ‘bar’ to standard output.
This is analogous to regular expressions. When matching foo|foobar and foobar|foo regular expressions, the result (whether the string matches) is the same, but the side effects of the execution may differ.
Conclusion
To be clear, I still have doubts whether foo|foobar and foobar|foo behaving differently is the right option. However, it’s also clear to say that it’s not as broken as I used to think; rather, it’s one of the peculiarities of regexes that one needs to be aware of. And specifically, aware of how regex engine they use behave.
1 John B. Fraleigh and Neal E. Brand. 2020. §4 Nonabelian Example. A First Course in Abstract Algebra (8th ed.). Pearson, Hoboken, NJ, USA. ISBN 978-0-13-575816-8. ↩
2 Admittedly, at least in some of the cases choice of a different operator may have been influenced by factors other than ‘mathematical purity’. Perl has separate set of operators for strings and numbers (e.g. $x == $y converts operands to numbers if necessary while $x eq $y converts them to strings). Visual Basic has both + and & operators with the latter always converting operands to strings first. In contrast JavaScript is infamous with its type coercion and it would likely benefit from having separate concatenation operator. ↩
3 David Goldberg. 1991. What every computer scientist should know about floating-point arithmetic. ACM Computing Surveys, Vol 23, Issue 1 (March 1991), 5–48. doi:10.1145/103162.103163. ↩
Friday, 21 February 2025
Privilege Separation in Go
Almost three weeks ago, I gave a talk on privilege separation in the Go programming language at FOSDEM 2025. In my talk, I was foolish enough to announce two blog posts, one I had already written and this one. After a few evenings where I found the time to work on this post, it is finally done.
The previous Dropping Privileges in Go post dealt with the privileges a computer program has. Usually, these privileges are derived from the executing user. If your user can read emails, a program executed by this user can do so as well. Then I showed certain techniques for giving up privileges on POSIX-like operating systems.
But is just limiting all privileges enough? Unfortunately, no, because there may be software projects dealing with both sensitive data as well as having dangerous code blocks. Consider an Internet-facing application that handles user credentials over a spooky committee-born protocol, perhaps even being parsed by a library notorious for security opportunities.
It is possible to split this application apart: Resulting in one restricted part having to deal with authentication, one even more restricted part handling the dangerous parser, and some communication in between. And, honestly, that is the gist of privilege separation. But since this has been a very superficial introduction, more details, specific to POSIX-leaning operating systems and the Go programming language, will follow.
Changes In Software Architecture
It might be a good idea to do some preliminary thinking before you start, to identify both the parts into which you want to divide the software, and the permissions that will be required throughout the life of those parts.
For example, a web application that manages its state in a SQLite database requires both network permissions (opening a port for incoming HTTP connections) and file system permissions (SQLite database). One could implement two subprocesses for each task and would end up with the supervising monitor process, a web server subprocesses (network permissions), and a SQLite subprocesses (file system permissions).
Taking the example from this theoretical level to the POSIX concepts introduced in my previous post, the supervising monitor process could launch two subprocesses, each running under unique user and group IDs. The network-facing subprocesses could be chrooted to an empty directory, while the database subprocess resides within a chroot containing the SQLite file. Alternatively, more modern but OS-specific features can be used to limit each process.
But, to address the second part of the initial issue, do our subprocesses really need those privileges throughout their lifetimes? The answer is very often “no”, especially if the software is designed to perform privileged operations first. An architectural goal might be to start with the most privileged operations, then drop those privileges, and continue this cycle until the main task can be performed, which might also be the most dangerous, e.g., parsing user input.
The example web server may only require the permissions to listen on a port at the beginning. After that, the subprocess should be fine with the file descriptor it already has.
Go Runtime
Nothing Go-specific has been stated so far. There are some elementary differences from C, such as Go having a runtime while C does not.
But there are low-level packages and functions in Go’s standard library that provide access to OS-specific features.
Most prominent is the frozen syscall package, which was replaced by golang.org/x/sys/unix for maintenance reasons and to break it free from the Go 1 compatibility promise.
So it is quite easy to port C-style privilege separation to Go, if one can adapt a bit.
Creating And Supervising Children
Even if Go has not quite reached C’s maturity, it has gone through over a decade of changes since Go version one.
Starting processes is one of the rare situations where one can actually see them.
While the syscall package had a ForkExec function, it did not made it into the golang.org/s/sys/unix package.
But wait, a quick interjection first.
In C, fork(2) and exec(3) are two independent system calls.
Using fork(2) creates a new process, and functions from the exec(3) family - like execve(2) - replace the current process with another process or, in simpler terms, start another process from an executable file in the current process.
In Go’s syscall.ForkExec, these two low-level functions have been merged together to provide a more higher-level interface.
This was most likely done to make it harder to break the Go runtime.
In addition to merging multiple functions into one, syscall.ForkExec also supports a wide range of specific attributes via syscall.SysProcAttr.
These attributes includes user and group switching, chrooting and even cgroup support (v1, I’d guess).
Unfortunately, this code was frozen ten years ago and SysProcAttr lacks documentation.
Thus, I would advise taking a look at its implementation, but not to use it.
One demotivating example might be the internal forkAndExecInChild1 function.
What to use instead?
The os package has a Process type and the os/exec package provides an even more abstract interface.
From now on, I will stick to os/exec and will do all privilege dropping by myself, even if os/exec still supports syscall.SysProcAttr.
For starters, a short demo to fork itself and select the child operation mode via a command line argument flag should do the trick.
A bit glue code can be written around os/exec, resulting in the forkChild function shown in the demo below.
package main

import (
	"bufio"
	"flag"
	"fmt"
	"log"
	"os"
	"os/exec"
	"time"
)

// forkChild forks off a subprocess with -fork-child flag.
//
// The extraFiles are additional file descriptors for communication.
func forkChild(childName string, extraFiles []*os.File) (*os.Process, error) {
	// pipe(2) to communicate child's output back to parent
	logParent, logChild, err := os.Pipe()
	if err != nil {
		return nil, err
	}

	// For the moment, just print the child's output
	go func() {
		scanner := bufio.NewScanner(logParent)
		for scanner.Scan() {
			log.Printf("[%s] %s", childName, scanner.Text())
		}
		if err := scanner.Err(); err != nil {
			log.Printf("Child output scanner failed: %v", err)
		}
	}()

	cmd := &exec.Cmd{
		Path: os.Args[0],
		Args: append(os.Args, "-fork-child", childName),

		Env: []string{}, // don't inherit parent's env

		Stdin:      nil,
		Stdout:     logChild,
		Stderr:     logChild,
		ExtraFiles: extraFiles,
	}
	if err := cmd.Start(); err != nil {
		return nil, err
	}

	return cmd.Process, nil
}
func main() {
	var flagForkChild string
	flag.StringVar(&flagForkChild, "fork-child", "", "")
	flag.Parse()

	switch flagForkChild {
	case "":
		// Parent code
		childProc, err := forkChild("demo", nil)
		if err != nil {
			log.Fatalf("Cannot fork child: %v", err)
		}
		log.Printf("Started child process, wait for it to finish")

		childProcState, _ := childProc.Wait()
		log.Printf("Child exited: %d", childProcState.ExitCode())

	case "demo":
		// Child code
		for i := range 3 {
			fmt.Printf("hello world, %d\n", i)
			time.Sleep(time.Second)
		}
		fmt.Println("bye")

	default:
		panic("This example has only one child")
	}
}
While this example is quite trivial, it demonstrates how the parent process can .Wait() for children and even inspect the exit code.
Using this information, the parent can monitor its children and raise an alarm, restart children or crash the whole execution if a child exits prematurely.
In a more concrete example, where each child should run as long as the parent, the code waits for the first child to die or for a wild SIGINT to appear, to clean up all child processes.
Inter-Process Communication
This first example was nice and all, but a bit useless.
So far, no communication between the processes - main/parent and demo - is possible.
This can be solved by creating a bidirectional communication channel between two processes, e.g., via socketpair(2).
A socketpair(2) is similar to a pipe(2), but it is bidirectional (both ends can read and write) and supports certain features usually reserved to Unix domain sockets.
Using the already mentioned golang.org/x/sys/unix package allows creating a trivial helper function.
// socketpair is a helper function wrapped around socketpair(2).
func socketpair() (parent, child *os.File, err error) {
	fds, err := unix.Socketpair(
		unix.AF_UNIX,
		unix.SOCK_STREAM|unix.SOCK_NONBLOCK,
		0)
	if err != nil {
		return
	}

	parent = os.NewFile(uintptr(fds[0]), "")
	child = os.NewFile(uintptr(fds[1]), "")
	return
}
The previously introduced forkChild function came with an extraFiles parameter, effectively setting exec.Cmd{ExtraFiles: extraFiles}.
These extra files are then passed as file descriptors to the newly created process following the standard streams stdin, stdout and stderr with file descriptors 0, 1 and 2 respectively.
Linking socketpair and forkChild’s extraFiles allows passing a bidirectional socket as file descriptor 3 to the child.
Let’s follow this idea and modify the demo part to implement a simple string-based API that supports both the hello and bye commands returning a useful message back to the sender.
case "demo":
	// Child code
	cmdFd := os.NewFile(3, "")
	cmdScanner := bufio.NewScanner(cmdFd)
	for cmdScanner.Scan() {
		switch cmd := cmdScanner.Text(); cmd {
		case "hello":
			_, _ = fmt.Fprintln(cmdFd, "hello again")

		case "bye":
			_, _ = fmt.Fprintln(cmdFd, "ciao")
			return
		}
	}
This code starts by opening the third file descriptor as an os.File, using it both for a line-wise reader and as a writer for the output.
The counterpart can be altered accordingly.
case "":
	// Parent code
	childCommParent, childCommChild, err := socketpair()
	if err != nil {
		log.Fatalf("socketpair: %v", err)
	}

	childProc, err := forkChild("demo", []*os.File{childCommChild})
	if err != nil {
		log.Fatalf("Cannot fork child: %v", err)
	}
	log.Printf("Started child process, wait for it to finish")

	cmdScanner := bufio.NewScanner(childCommParent)
	for _, cmd := range []string{"hello", "hello", "bye"} {
		_, _ = fmt.Fprintln(childCommParent, cmd)
		log.Printf("Send %q command to child", cmd)
		_ = cmdScanner.Scan()
		log.Printf("Received from child: %q", cmdScanner.Text())
	}

	childProcState, _ := childProc.Wait()
	log.Printf("Child exited: %d", childProcState.ExitCode())
In this example, the socketpair(2) is first created using our previously defined helper function.
The child part of the socketpair is then passed to the newly created child process, while the parent part is then used for communication.
As an example, hello is called twice, followed by a bye call, expecting the child to finish afterwards.
Running this demo will look as follows. The RPC API works!
2025/02/12 22:05:45 Started child process, wait for it to finish
2025/02/12 22:05:45 Send "hello" command to child
2025/02/12 22:05:45 Received from child: "hello again"
2025/02/12 22:05:45 Send "hello" command to child
2025/02/12 22:05:45 Received from child: "hello again"
2025/02/12 22:05:45 Send "bye" command to child
2025/02/12 22:05:45 Received from child: "ciao"
2025/02/12 22:05:45 Child exited: 0
This RPC is quite simple, even for demonstration purposes. So it should be replaced by something more powerful that one would expect to find in real-world applications.
Dropping Privileges
Wait, before we get serious about RPCs, we should first introduce dropping privileges. Otherwise, doing everything that follows would be useless.
The motivation for this post started with a mental image of a program being split into several subprograms, each running only with the necessary privileges. The first part - breaking down a program - has already been addressed. Now it is time to drop privileges.
Luckily, this section will be rather short, since I felt that I have wrote more than enough on this topic in my earlier Dropping Privileges in Go post. I will assume that it was read or at least skimmed.
Looking at the demonstration program, there is a main thread that starts the child before communicating with it, and the child itself just handling some IO.
For this example, I am going to use my syscallset-go library to restrict system calls via Seccomp BPF.
While this only works on Linux, there are mechanisms for other operating systems, as mentioned in my previous post, e.g., pledge(2) on OpenBSD.
The main program first needs the privileges to create a socketpair(2) and launch the other program.
After that, it still communicates over the created file descriptor and monitors the other process.
So there are two places where privileges can be dropped: initially and after launching the process.
Please take a look at this altered main part, where the two highlighted syscallset.LimitTo blocks drop privileges.
case "":
	// Parent code
	if err := syscallset.LimitTo("@system-service"); err != nil {
		log.Fatalf("seccomp-bpf: %v", err)
	}

	childCommParent, childCommChild, err := socketpair()
	if err != nil {
		log.Fatalf("socketpair: %v", err)
	}

	childProc, err := forkChild("demo", []*os.File{childCommChild})
	if err != nil {
		log.Fatalf("Cannot fork child: %v", err)
	}
	log.Printf("Started child process, wait for it to finish")

	if err := syscallset.LimitTo("@basic-io @io-event @process"); err != nil {
		log.Fatalf("seccomp-bpf: %v", err)
	}

	cmdScanner := bufio.NewScanner(childCommParent)
	for _, cmd := range []string{"hello", "hello", "bye"} {
		_, _ = fmt.Fprintln(childCommParent, cmd)
		log.Printf("Send %q command to child", cmd)
		_ = cmdScanner.Scan()
		log.Printf("Received from child: %q", cmdScanner.Text())
	}

	childProcState, _ := childProc.Wait()
	log.Printf("Child exited: %d", childProcState.ExitCode())
Same must be done for the demo program, where the only privileged task is opening the file descriptor 3 for communication.
Afterwards, this process only needs to do IO for its simple RPC task.
case "demo":
	// Child code
	if err := syscallset.LimitTo("@system-service"); err != nil {
		log.Fatalf("seccomp-bpf: %v", err)
	}

	cmdFd := os.NewFile(3, "")

	if err := syscallset.LimitTo("@basic-io @io-event"); err != nil {
		log.Fatalf("seccomp-bpf: %v", err)
	}

	cmdScanner := bufio.NewScanner(cmdFd)
	for cmdScanner.Scan() {
		switch cmd := cmdScanner.Text(); cmd {
		case "hello":
			_, _ = fmt.Fprintln(cmdFd, "hello again")

		case "bye":
			_, _ = fmt.Fprintln(cmdFd, "ciao")
			return
		}
	}
Let’s take a moment to reflect on what was accomplished so far. Splitting up the process and applying different system call filters resulted in a first privilege separated demo. This was actually a lot less code than one might expect.
Using A Real RPC
After reminding ourselves of how to drop privileges, we will move on to a larger example using this technique while also using a more mature RPC.
Since I find gRPC too powerful for this task, I will stick to Go’s net/rpc package, despite its shortcomings and feature-frozen state.
While the previous examples were very demo-like, the following one should be a bit more realistic. When finished, a child process should serve a simplified interface to a SQLite database, allowing only certain requests, while the main process should also drop privileges and serve the database’s content through a web server. To give it a realistic spin, let’s call this a web blog (or blog, as the cool kids say).
The skeleton with the forkChild method and the -fork-child command line argument based main method remains.
However, the database needs some code, especially some that can be used by net/rpc.
The following should work, creating a Database type and two RPC methods, ListPosts and GetPost.
// Database is a wrapper type around *sql.DB.
type Database struct {
	db *sql.DB
}

// OpenDatabase opens or creates a new SQLite database at the given file.
//
// If the database should be created, it will be populated with the posts table
// and two example entries.
func OpenDatabase(file string) (*Database, error) {
	_, fileInfoErr := os.Stat(file)
	requiresSetup := errors.Is(fileInfoErr, os.ErrNotExist)

	db, err := sql.Open("sqlite3", file)
	if err != nil {
		return nil, err
	}

	if requiresSetup {
		if _, err := db.Exec(`
			CREATE TABLE posts (id INTEGER NOT NULL PRIMARY KEY, text TEXT);
			INSERT INTO posts(id, text) VALUES (0, 'hello world!');
			INSERT INTO posts(id, text) VALUES (1, 'second post, wow');
		`); err != nil {
			return nil, fmt.Errorf("cannot prepare database: %w", err)
		}
	}

	return &Database{db: db}, nil
}

// ListPosts returns all post ids as an array of integers.
//
// This method follows the net/rpc method specification.
func (db *Database) ListPosts(_ *int, ids *[]int) error {
	rows, err := db.db.Query("SELECT id FROM posts")
	if err != nil {
		return err
	}

	*ids = make([]int, 0, 128)
	for rows.Next() {
		var id int
		if err := rows.Scan(&id); err != nil {
			return err
		}
		*ids = append(*ids, id)
	}
	return rows.Err()
}

// GetPost returns a post's text for the id.
//
// This method follows the net/rpc method specification.
func (db *Database) GetPost(id *int, text *string) error {
	return db.db.QueryRow("SELECT text FROM posts WHERE id = ?", &id).Scan(text)
}
Without further ado, create a database main entry using this Database type.
In this case, the child will not be named demo, since it now serves a real purpose.
case "database":
	// SQLite database child for posts
	if err := syscallset.LimitTo("@system-service"); err != nil {
		log.Fatalf("seccomp-bpf: %v", err)
	}

	rpcFd := os.NewFile(3, "")

	db, err := OpenDatabase("posts.sqlite")
	if err != nil {
		log.Fatalf("Cannot open SQLite database: %v", err)
	}

	if err := landlock.V5.BestEffort().RestrictPaths(
		landlock.RODirs("/proc"),
		landlock.RWFiles("posts.sqlite"),
	); err != nil {
		log.Fatalf("landlock: %v", err)
	}
	if err := syscallset.LimitTo("@basic-io @io-event @file-system"); err != nil {
		log.Fatalf("seccomp-bpf: %v", err)
	}

	rpcServer := rpc.NewServer()
	rpcServer.Register(db)
	rpcServer.ServeConn(rpcFd)
This code starts by dropping some privileges to prohibit the juicy syscalls.
Then it opens the already known file descriptor 3 next to the SQLite database located at posts.sqlite.
Since no more files need to be accessed at this point, the privileges are being dropped again.
Starting with Landlock LSM, only allowing read-only access to Linux’ /proc required by some Go internals and read-write access to the posts.sqlite database file.
Next comes a stricter system call filter.
Finally, the net/rpc is started on the third file descriptor serving the Database.
This will block until the connection is closed, which effectively means the child has finished.
The main part now needs to follow.
As initially outlined, it should start by forking off the database child, then drop its own privileges, and finally serving a web server.
Since there are two RPC methods Database.ListPosts and Database.GetPost, they can be queried from the main code and used to build the web frontend for this blog.
case "":
	// Parent: Starts children, drops to HTTP server
	if err := syscallset.LimitTo("@system-service"); err != nil {
		log.Fatalf("seccomp-bpf: %v", err)
	}

	databaseCommParent, databaseCommChild, err := socketpair()
	if err != nil {
		log.Fatalf("socketpair: %v", err)
	}

	_, err = forkChild("database", []*os.File{databaseCommChild})
	if err != nil {
		log.Fatalf("Cannot fork database child: %v", err)
	}

	httpLn, err := net.Listen("tcp", ":8080")
	if err != nil {
		log.Fatalf("cannot listen: %v", err)
	}

	if err := landlock.V5.BestEffort().RestrictPaths(
		landlock.RODirs("/proc"),
	); err != nil {
		log.Fatalf("landlock: %v", err)
	}
	if err := syscallset.LimitTo("@basic-io @io-event @network-io @file-system"); err != nil {
		log.Fatalf("seccomp-bpf: %v", err)
	}

	rpcClient := rpc.NewClient(databaseCommParent)

	httpMux := http.NewServeMux()
	httpMux.HandleFunc("GET /", func(w http.ResponseWriter, r *http.Request) {
		w.Header().Add("Content-Type", "text/html")

		var ids []int
		err = rpcClient.Call("Database.ListPosts", 0, &ids)
		if err != nil {
			http.Error(w, "cannot list posts: "+err.Error(), http.StatusInternalServerError)
			return
		}

		_, _ = fmt.Fprint(w, `<ul>`)
		for _, id := range ids {
			_, _ = fmt.Fprintf(w, `<li><a href="/post/%d">Post %d</a></li>`, id, id)
		}
		_, _ = fmt.Fprint(w, `</ul>`)
	})
	httpMux.HandleFunc("GET /post/{id}", func(w http.ResponseWriter, r *http.Request) {
		w.Header().Add("Content-Type", "text/html")

		id, err := strconv.Atoi(r.PathValue("id"))
		if err != nil {
			http.Error(w, "cannot parse ID: "+err.Error(), http.StatusInternalServerError)
			return
		}

		var text string
		err = rpcClient.Call("Database.GetPost", &id, &text)
		if err != nil {
			http.Error(w, "cannot fetch post: "+err.Error(), http.StatusInternalServerError)
			return
		}

		_, _ = fmt.Fprintf(w, `<h1>Post %d</h1><p>%s</p>`, id, html.EscapeString(text))
	})

	httpd := http.Server{Handler: httpMux}
	log.Fatal(httpd.Serve(httpLn))
Like the child, the main part started by dropping system calls to the reasonable @system-service group.
Then it creates the socketpair(2) and launches the child, as done in the previous examples.
Another privileged operation follows, opening a TCP port to listen on :8080.
At this point, privileges can be dropped further, again using Landlock LSM and Seccomp BPF.
Following, an RPC client connection is established against the parent’s side of the socketpair(2) and the web server’s endpoints are defined.
All known posts should be listed on /, which can be requested from the RPC client via the Database.ListPosts method.
More details will then be available on /post/{id} using the Database.GetPost RPC method.
In the end, a http.Server has been created and is being served on the previously created TCP listener.
Incoming requests are served and result in an RPC call to the child process that is allowed to access the database.
Passing Around File Descriptors
While this RPC works well for these constraints, what about file access? Think about an RPC API that needs to access lots of files and pass the contents from one process to another. Reading the whole file, encoding it, sending it, receiving it and decoding it does not sound very efficient. Fortunately, there is a way to actually share file descriptors between processes for POSIX.
One process can open a file, pass the file descriptor to the other process, and close the file again, while the other process can now read the file, even though it would not have no access to it. The art of passing file descriptors is a bit more obscure and beautifully explained in chapter 17.4 Passing File Descriptors of the definitive book Advanced Programming in the Unix Environment. If you are interested in the details, please check it out - PDFs are available online.
The following works as our socketpair(2) call created a pair of AF_UNIX sockets, effectively being Unix domain sockets
In addition to exchanging streaming data over a Unix domain socket, it is also possible to pass specific messages.
But let’s start with the code, which may look a bit cryptic on its own.
// unixConnFromFile converts a file (FD) into an Unix domain socket.
func unixConnFromFile(f *os.File) (*net.UnixConn, error) {
	fConn, err := net.FileConn(f)
	if err != nil {
		return nil, err
	}

	conn, ok := fConn.(*net.UnixConn)
	if !ok {
		return nil, fmt.Errorf("cannot use (%T, %T) as *net.UnixConn", f, conn)
	}
	return conn, nil
}

// sendFd sends an open File (its FD) over an Unix domain socket.
func sendFd(f *os.File, conn *net.UnixConn) error {
	oob := unix.UnixRights(int(f.Fd()))
	_, _, err := conn.WriteMsgUnix(nil, oob, nil)
	return err
}

// recvFd receives a File (its FD) from an Unix domain socket.
func recvFd(conn *net.UnixConn) (*os.File, error) {
	oob := make([]byte, 128)
	_, oobn, _, _, err := conn.ReadMsgUnix(nil, oob)
	if err != nil {
		return nil, err
	}

	cmsgs, err := unix.ParseSocketControlMessage(oob[0:oobn])
	if err != nil {
		return nil, err
	} else if len(cmsgs) != 1 {
		return nil, fmt.Errorf("ParseSocketControlMessage: wrong length %d", len(cmsgs))
	}

	fds, err := unix.ParseUnixRights(&cmsgs[0])
	if err != nil {
		return nil, err
	} else if len(fds) != 1 {
		return nil, fmt.Errorf("ParseUnixRights: wrong length %d", len(fds))
	}

	return os.NewFile(uintptr(fds[0]), ""), nil
}
Starting with the unixConnFromFile function, which creates a *net.UnixConn based on a generic *os.File.
This allows converting one end of the socketpair(2) to a Unix domain socket without losing Go’s type safety.
Then, the sendFd function encodes the file descriptor to be sent into a socket control message and sends it over the virtual wire.
On the other side, the recvFd function waits for such a control message, unpacks it and returns a new *os.File to be used.
To give a little background, each process has its own file descriptor table, each entry is represented in the kernel’s file table, which is eventually mapped to a vnode entry. Thus, one process’ file descriptor 42 and another’s file descriptor 23 could actually be the same file. Same applies here, sending a file descriptor will most likely result in a different file descriptor number at the receiving end. However, the kernel will take care that this little stunt works.
Again, please consult Stevens’ Advanced Programming in the Unix Environment for more details or take a look at the implementation in the golang.org/x/sys/unix package.
Or just accept that it works and move on.
Let’s extend the previous example and add another child process that serves pictures for each blog post to be shown. This child will need file system access to a directory of images, sending them over to the main process via file descriptor passing, as just introduced.
First, implement the new child.
case "img":
	// File storage child to send pictures for posts back as a file descriptor
	if err := syscallset.LimitTo("@system-service"); err != nil {
		log.Fatalf("seccomp-bpf: %v", err)
	}

	rpcFd := os.NewFile(3, "")

	rpcSock, err := unixConnFromFile(rpcFd)
	if err != nil {
		log.Fatalf("cannot create Unix Domain Socket: %v", err)
	}

	imgDir, err := filepath.Abs("./cmd/07-05-fork-exec-rpc/imgs/")
	if err != nil {
		log.Fatalf("cannot abs: %v", err)
	}

	if err := landlock.V5.BestEffort().RestrictPaths(
		landlock.RODirs("/proc", imgDir),
	); err != nil {
		log.Fatalf("landlock: %v", err)
	}
	if err := syscallset.LimitTo("@basic-io @io-event @file-system @network-io"); err != nil {
		log.Fatalf("seccomp-bpf: %v", err)
	}

	rpcScanner := bufio.NewScanner(rpcFd)
	for rpcScanner.Scan() {
		file, err := filepath.Abs(imgDir + "/" + rpcScanner.Text() + ".png")
		if err != nil {
			log.Printf("cannot abs: %v", err)
			continue
		}
		if dir := filepath.Dir(file); dir != imgDir {
			log.Printf("file directory %q mismatches, expected %q", dir, imgDir)
			continue
		}

		f, err := os.Open(file)
		if err != nil {
			log.Printf("cannot open: %v", err)
			continue
		}

		if err := sendFd(f, rpcSock); err != nil {
			log.Printf("cannot send file descriptor: %v", err)
		}
		_ = f.Close()
	}
I hope you are not bored reading this kind of code.
It gets pretty repetitive, I know.
But please bear with me and follow me through the img child.
The first part should be quite familiar by now: forbidding some syscalls and opening file descriptor 3. But now the third file descriptor is also converted to a Unix domain socket for later use. Landlock LSM restricts directory access to the directory containing the pictures, and a stricter Seccomp BPF filter follows.
After that, a simple string-based RPC is being used again, which reads what files to open line by line. Besides a simple prefix check, the Landlock LSM filter denies everything outside the allowed directory. If the file can be opened, its file descriptor will be send back to the main process.
A few small changes are required in the main process. They are highlighted and explained below.
case "":
	// Parent: Starts children, drops to HTTP server
	if err := syscallset.LimitTo("@system-service"); err != nil {
		log.Fatalf("seccomp-bpf: %v", err)
	}

	databaseCommParent, databaseCommChild, err := socketpair()
	if err != nil {
		log.Fatalf("socketpair: %v", err)
	}
	imgCommParent, imgCommChild, err := socketpair()
	if err != nil {
		log.Fatalf("socketpair: %v", err)
	}

	imgCommSock, err := unixConnFromFile(imgCommParent)
	if err != nil {
		log.Fatalf("cannot create Unix Domain Socket: %v", err)
	}

	_, err = forkChild("database", []*os.File{databaseCommChild})
	if err != nil {
		log.Fatalf("Cannot fork database child: %v", err)
	}
	_, err = forkChild("img", []*os.File{imgCommChild})
	if err != nil {
		log.Fatalf("Cannot fork img child: %v", err)
	}

	httpLn, err := net.Listen("tcp", ":8080")
	if err != nil {
		log.Fatalf("cannot listen: %v", err)
	}

	if err := landlock.V5.BestEffort().RestrictPaths(
		landlock.RODirs("/proc"),
	); err != nil {
		log.Fatalf("landlock: %v", err)
	}
	if err := syscallset.LimitTo("@basic-io @io-event @network-io @file-system"); err != nil {
		log.Fatalf("seccomp-bpf: %v", err)
	}

	rpcClient := rpc.NewClient(databaseCommParent)

	httpMux := http.NewServeMux()
	httpMux.HandleFunc("GET /", func(w http.ResponseWriter, r *http.Request) {
        // Same as before.
	})
	httpMux.HandleFunc("GET /post/{id}", func(w http.ResponseWriter, r *http.Request) {
		w.Header().Add("Content-Type", "text/html")

		id, err := strconv.Atoi(r.PathValue("id"))
		if err != nil {
			http.Error(w, "cannot parse ID: "+err.Error(), http.StatusInternalServerError)
			return
		}

		var text string
		err = rpcClient.Call("Database.GetPost", &id, &text)
		if err != nil {
			http.Error(w, "cannot fetch post: "+err.Error(), http.StatusInternalServerError)
			return
		}

		_, _ = fmt.Fprintln(imgCommParent, id)
		imgFd, err := recvFd(imgCommSock)
		if err != nil {
			http.Error(w, "cannot fetch img: "+err.Error(), http.StatusInternalServerError)
		}
		defer imgFd.Close()

		_, _ = fmt.Fprintf(w, `<h1>Post %d</h1><p>%s</p>`, id, html.EscapeString(text))
		_, _ = fmt.Fprint(w, `<img src="data:image/png;base64,`)

		encoder := base64.NewEncoder(base64.StdEncoding, w)
		io.Copy(encoder, imgFd)
		encoder.Close()

		_, _ = fmt.Fprint(w, `" />`)
	})

	httpd := http.Server{Handler: httpMux}
	log.Fatal(httpd.Serve(httpLn))
The first changes are to create another socketpair(2) and fork off the second child.
Except for also creating a unixConnFromFile, they are analogous to the startup code for the first child process.
The interesting part happens inside the HTTP handler for /post/{id}.
If the SQLite database knows of a post for the id, that id is written to the parent’s socketpair(2) end to be read the by the img child’s RPC loop.
The code then waits to receive a file descriptor over the Unix domain socket created on the same connection.
After receiving the file descriptor, its content is copied into a base64 encoder and written as an encoded image back to the web response.
This example now has two subprocesses, each running with differently restricted privileges. An RPC mechanism in between allows inter-process communication, including the passing of file descriptors. At this point, it is safe to say that privilege separation has been achieved.
What’s Next?
This post was the logical successor to Dropping Privileges in Go. While the first one described how to drop various privileges, this one focused on architectural changes to drop privileges more granularly. Adding privilege separation to the toolbox of software architectures makes it possible to build more robust software under the assumption that the software will be pwned some day.
The examples shown here and more are available in a public git repository at codeberg.org/oxzi/go-privsep-showcase. Before creating these explicit examples, I have toyed with these technologies in a “research project” of mine, called gosh. Please feel free to take a look at it for more inspirations.
There are still some related topics I plan to write about, but I would not go so far and create any announcements. Stay tuned.
Sunday, 16 February 2025
The weekend after I ♥ Free Software Day 2025 – Sunday
This is part II of the I Love Free Software Day blogpost. More specifially it is about the game Veloren which I played once three years ago, when the pandemic was still ongoing. My computer that I had at time did not have a good GPU, so I used my brothers old computer with an NVIDIA card. A few years I got into VR which is only possible in freedom thanks to the libsurvive project. To be able to play VR games I baught an AMD graphics card, before that I used my Talos II’s built-in ASpeed graphics. With the new GPU I can drive up to 4 monitors. All the games that I run on my Talos II are free software:
VRChat is popular in the Transgender  community, but I avoid it since it is non-free. V-Sekai is one of the free software replacements. While we need binaries to run a program on a computer, we also need source code for a program to qualify as free software. I am using part of the V-Sekai code in my BeatSaber clone called BeepSaber as I want full body tracking controlling an animated VRM avatar. While I usually present masculine as an enby


 (I never wear a beard), my VRM avatar will be female
  . For me that is a way to try out genders different from my gender assigned at birth.
There is another free software VR game that I would like to play. It is called VoxelWorksQuest and its author is the same person that wrote BeepSaber. Unfortunately it is unmaintained, so I decided to replace it with with a VR port of minetest (now called luanti). Minetest is similar to Minecraft and Veloren, but it is both free software and able to run on old computers with built-in freedom respecting GPUs. Luanti is also written in a programming language called lua, which I use at work a lot. In the next few weeks I will be continuing to work on Minetest XR adding missing important features to make the game playable.
Next month I will go to the Chemnitzer Linux-Tage where I also expect to meet many queers  . There is also a “Gaming Night”
  and many interesting talks, including one about KiCad (the tool that I use for building my own hardware), BTRFS (my preferred filesystem), Banking apps (unfortunately not GNU Taler) and Passkeys (allowing passwordless login). In the meantime I will watch recorded videos from FOSDEM, starting with “Declarative and Minimalistic Computing” then moving to “Open Hardware and CAD/CAM”.
Planet FSFE (en):  RSS 2.0 | Atom |
  FOAF |
0x21
Albrechts Blog
Alessandro's blog
Andrea Scarpino's blog
André Ockers on Free Software
Bela's Internship Blog
Bernhard's Blog
Bits from the Basement
Blog of Martin Husovec
Bobulate
Brian Gough’s Notes
Chris Woolfrey — FSFE UK Team Member
Ciarán’s free software notes
Colors of Noise - Entries tagged planetfsfe
Communicating freely
Daniel Martí's blog
David Boddie - Updates (Full Articles)
ENOWITTYNAME
English Planet – Dreierlei
English on Björn Schießle - I came for the code but stayed for the freedom
English – Abandoned blog
English – Alessandro at FSFE
English – Alina Mierlus – Building the Freedom
English – Being Fellow #952 of FSFE
English – Blog
English – FSFE supporters Vienna
English – Free Software for Privacy and Education
English – Free speech is better than free beer
English – Nicolas Jean's FSFE blog
English – Paul Boddie's Free Software-related blog
English – The Girl Who Wasn't There
English – Thinking out loud
English – Viktor's notes
English – With/in the FSFE
English – gollo's blog
English – mkesper's blog
English – nico.rikken’s blog
Escape to freedom
Evaggelos Balaskas - System Engineer
FSFE interviews its Fellows
FSFE – Frederik Gladhorn (fregl)
FSFE – Matej's blog
Fellowship News
Free Software & Digital Rights Noosphere
Free Software on Carmen Bianca BAKKER
Free Software with a Female touch
Free Software – Torsten's Thoughtcrimes
Free Software – hesa's Weblog
Free as LIBRE
Free, Easy and Others
FreeSoftware – egnun's blog
From Out There
Giacomo Poderi
Green Eggs and Ham
Handhelds, Linux and Heroes
HennR’s FSFE blog
Henri Bergius
Karsten on Free Software
Losca
MHO
Mario Fux
Matthias Kirschner's Web log - fsfe
Max Mehl (English)
Michael Clemens
Myriam's blog
Mäh?
Nice blog
Nikos Roussos - opensource
Pressreview
Rekado
Riccardo (ruphy) Iaconelli – blog
Saint’s Log
TSDgeos' blog
Tarin Gamberini
Technology – Intuitionistically Uncertain
The trunk
Thomas Løcke Being Incoherent
Told to blog - Entries tagged fsfe
Tonnerre Lombard
Vincent Lequertier's blog
Vitaly Repin. Software engineer's blog
Weblog
Weblog
Weblog
Weblog
Weblog
Weblog
a fellowship ahead
agger's Free Software blog
anna.morris's blog
ayers's blog
bb's blog
blog
en – Florian Snows Blog
en – PB's blog
en – rieper|blog
english – Davide Giunchi
english – Torsten's FSFE blog
foss – vanitasvitae's blog
free software blog
freedom bits
freesoftware – drdanzs blog
fsfe – Thib's Fellowship Blog
julia.e.klein’s blog
marc0s on Free Software
mina86.com (In English)
pichel’s blog
planet-en – /var/log/fsfe/flx
polina's blog
softmetz' anglophone Free Software blog
stargrave's blog
tobias_platen's blog
tolld's blog
wkossen’s blog
yahuxo’s blog